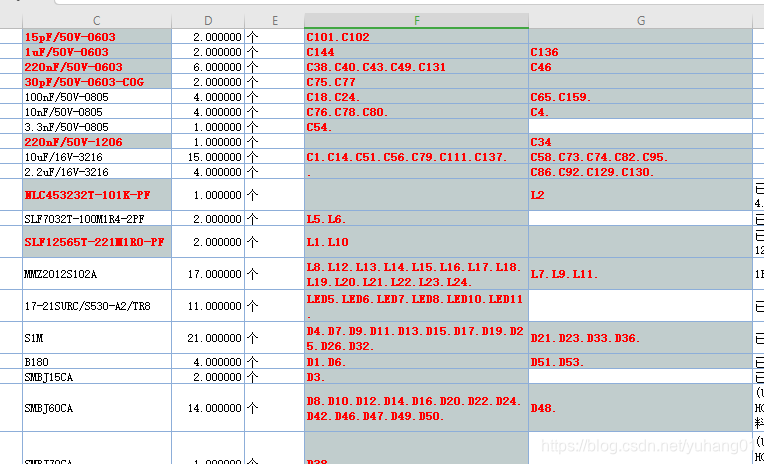
前段时间公司的一个同事突然加我,想让我给他做一个对比两个Excel文件中的指定分类下数据的差异,并将有差异的单元格中有差异的确切值进行字体标红,这时再人工记录下来(我称之为文件差异比对改善项目) 再跟他进行需求确认时,他的需求是分别读取两个excel表格中的指定列中的数据,其中每个表格中的指定列的数据都是杂乱的,所以无法以指定的某个表当作参照来比对其中的不同,我这里的处理方法是分别将表1作为参照去比对表2,然后再拿表2去比对表一,确保能够找到表一对比表二时数据的不同以及表二对表一,确保数据的准确性,以及他想要将比对过的有不同的单元格内不同的指定值给标红,这里我也做了几个测试,无法实现在单元格内指定部分文字的字体颜色,所以我这里直接将比对完成后不同的数据进行显示,标红整个单元格内的字体以及单元格背景颜色,以及其中C列为两个表中的唯一值,先拿表一中的C列值去和表二中的C列进行比对 ,确定表一表二共有的一行,然后再拿共有的这一行去进行F,G列数据比对,如果表一有表二没有,直接标红不再进行比对处理,同样道理,再拿表二的C列值和表一的。 欧克,这里已经时所有的代码了 ,你可以将我的代码试着运行看看如果对你有用的话 当你运行代码时就会生成和我上面效果图一样的效果,但是如何将用户去体验呢,这里就用到了我们的打包生成桌面小程序 操作步骤: 其中要注意的是你在敲pyinstaller的前面的路径就是你生成程序的所在位置 以我的E:pythonpackagecarroom为例,运行成功后 生成的程序就在我的E:pythonpackagecarroom文件夹下: 但是当你运行程序时也会显示控制台窗口 直接影响用户体验 -F 表示生成单个可执行文件,执行后dist目录中出现了python_test.exe文件,没有任何依赖库,执行它即可。 -w 表示去掉控制台窗口,这在GUI界面时非常有用。不过如果是命令行程序的话那就把这个选项删除吧! ok 这样完整版的程序就算做出来了 哈哈 如果对你有用 记得点个赞咱再走啊 么么哒
背景介绍:
经过一段时间的聊天以及多次碰面,终于将需求确定下来,直接上一波效果图: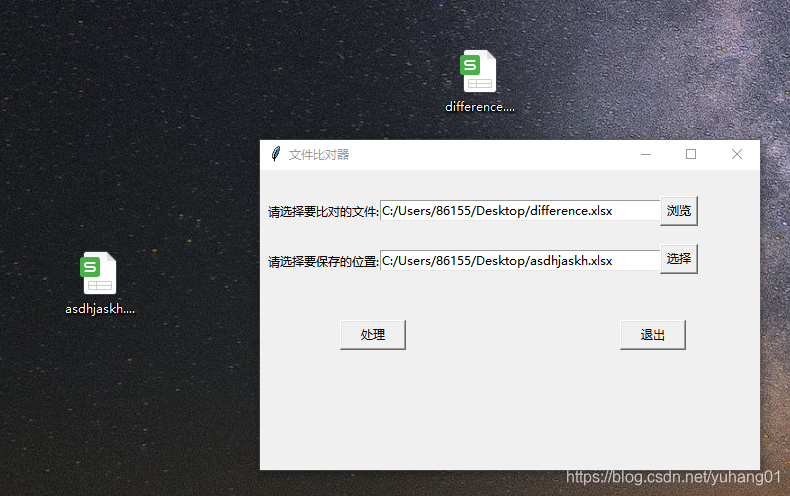

这里主要用到的库是openpyxl(python的一个强大的操作Excel的库)和tkinter(GUI简单的桌面程序化)需求可行性分析:
项目实施:
from tkinter import * from tkinter import filedialog import openpyxl from openpyxl.styles import Font, Border, Side, PatternFill, colors, Alignment import tkinter.messagebox font_false = Font(size=9, bold=True, color="FF0000") red_fill = PatternFill("solid", fgColor="C1CDCD") def main(): def fun_finish(shift, currentrow): data = "" if len(shift) > 0: for i in shift: data += str(i) + "." currentrow.fill = red_fill currentrow.font = font_false currentrow.value = data def fun_diff(start, end): arrShirt2 = [] for i in start: a = 0 for j in end: if i == j: a += 1 if a == 0: arrShirt2.append(i) return arrShirt2 def selectExcelfile(): text1.delete(0, END) sfname = filedialog.askopenfilename(title='选择Excel文件', filetypes=[('Excel', '*.xlsx'), ('All Files', '*')]) text1.insert(INSERT, sfname) def doProcess(): startFile = text1.get() endFile = text2.get() wb = openpyxl.load_workbook(startFile) # get workbook every son sheet1 = wb['sheet1'] sheet2 = wb['sheet2'] for rows in range(7, sheet2.max_row - 4): guige2 = sheet2['C' + str(rows)].value ishave = False for anorows in range(7, sheet1.max_row - 4): guige1 = sheet1['C' + str(anorows)].value if guige2 == guige1: ishave = True if not ishave: sheet2['C' + str(rows)].fill = red_fill sheet2['C' + str(rows)].font = font_false sheet2['F' + str(rows)].fill = red_fill sheet2['F' + str(rows)].font = font_false sheet2['G' + str(rows)].fill = red_fill sheet2['G' + str(rows)].font = font_false for row in range(7, sheet1.max_row - 4): # 先判断sheet1 C列的子件规格的每一个和 sheet2中的 C列的子件规格进行对比 guige1 = sheet1['C' + str(row)].value ishave = False currentAnoRow = -1 for anorow in range(7, sheet2.max_row - 4): guige2 = sheet2['C' + str(anorow)].value if guige1 == guige2: ishave = True currentAnoRow = anorow if ishave: # 对比F/G的差异 tp1 = sheet1['F' + str(row)].value tp2 = sheet2['F' + str(currentAnoRow)].value bm1 = sheet1['G' + str(row)].value bm2 = sheet2['G' + str(currentAnoRow)].value if tp1 is None or tp2 is None: print('loading') else: if tp1 != tp2: print(type(tp1)) top1 = tp1.split(".") top2 = tp2.split(".") topshift1 = fun_diff(top1, top2) topshift2 = fun_diff(top2, top1) fun_finish(topshift1, sheet1['F' + str(row)]) fun_finish(topshift2, sheet2['F' + str(currentAnoRow)]) if bm1 is None or bm2 is None: print('loadnig again') else: if bm1 != bm2: bottom1 = bm1.split(".") bottom2 = bm2.split(".") bottomshift1 = fun_diff(bottom1, bottom2) bottomshift2 = fun_diff(bottom2, bottom1) fun_finish(bottomshift1, sheet1['G' + str(row)]) fun_finish(bottomshift2, sheet2['G' + str(currentAnoRow)]) else: sheet1['C' + str(row)].fill = red_fill sheet1['C' + str(row)].font = font_false sheet1['F' + str(row)].fill = red_fill sheet1['F' + str(row)].font = font_false sheet1['G' + str(row)].fill = red_fill sheet1['G' + str(row)].font = font_false else: tkinter.messagebox.showinfo('提示', '已处理完成,可在已选择的文件位置进行查看。') wb.save(endFile) def closeThisWindow(): root.destroy() def saveExcelfile(): text2.delete(0, END) sfname = filedialog.asksaveasfilename(title='选择保存的文件位置', filetype=[('Excel', '*.xlsx')]) sfname = sfname + ".xlsx" text2.insert(INSERT, sfname) root = Tk() # 设置窗体标题 root.title('文件比对器') # 设置窗口大小和位置 root.geometry('500x300+570+200') label1 = Label(root, text='请选择要比对的文件:') text1 = Entry(root, bg='white', width=40) button1 = Button(root, text='浏览', width=4, height=1, command=selectExcelfile) label2 = Label(root, text='请选择要保存的位置:') text2 = Entry(root, bg='white', width=40) button2 = Button(root, text='选择', width=4, height=1, command=saveExcelfile) button3 = Button(root, text='处理', width=8, command=doProcess) button4 = Button(root, text='退出', width=8, command=closeThisWindow) label1.pack() text1.pack() button1.pack() label2.pack() button2.pack() button3.pack() label1.place(x=5, y=30) text1.place(x=120, y=30) button1.place(x=400, y=26) label2.place(x=5, y=80) text2.place(x=120, y=80) button2.place(x=400, y=74) button3.place(x=80, y=150) button4.place(x=360, y=150) root.mainloop() if __name__ == "__main__": main() 生成桌面程序
如果你是第一次打包是要将pip的路径设置到你电脑的环境变量中,否则无法进行打包操作 这里就不做这个操作 不懂得可以问度娘 直接上重点:
简单的打包方式:
win+R 输入cmd
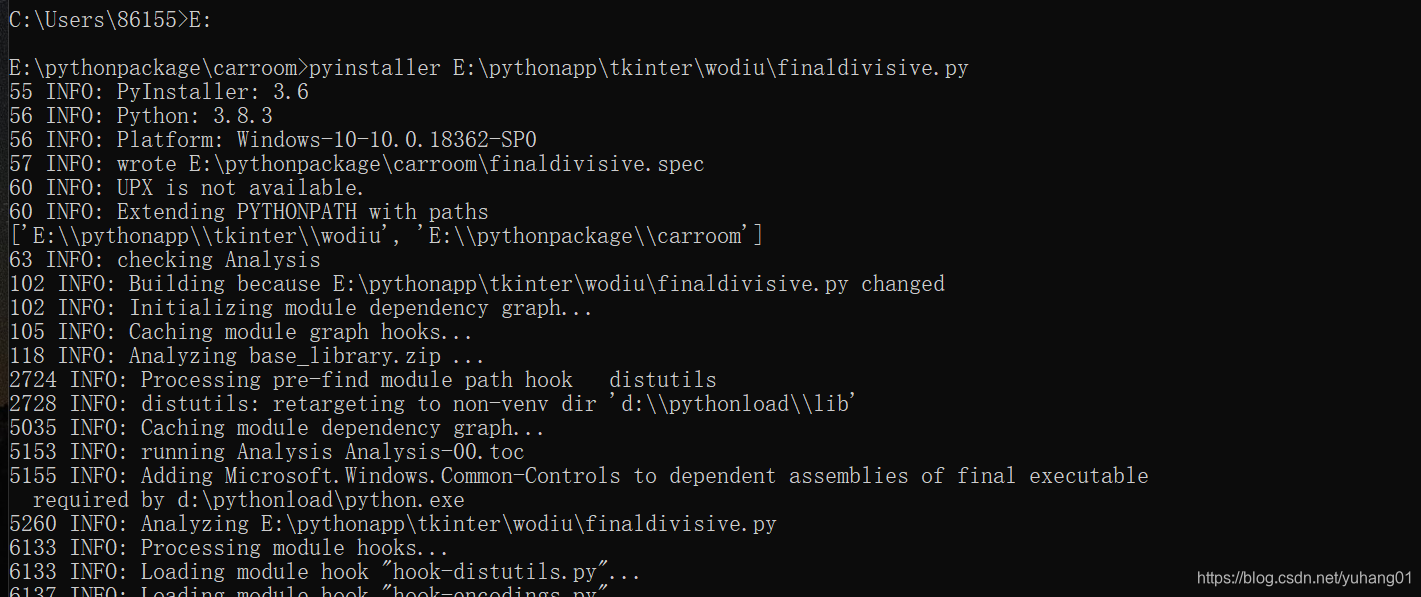
输入>pyinstaller E:你的要执行的py的路径 点击回车 当看到最后显示success就说明已经成功了
ok 这里已经成功了
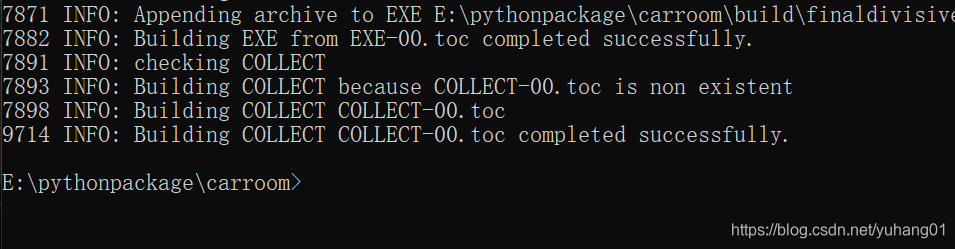
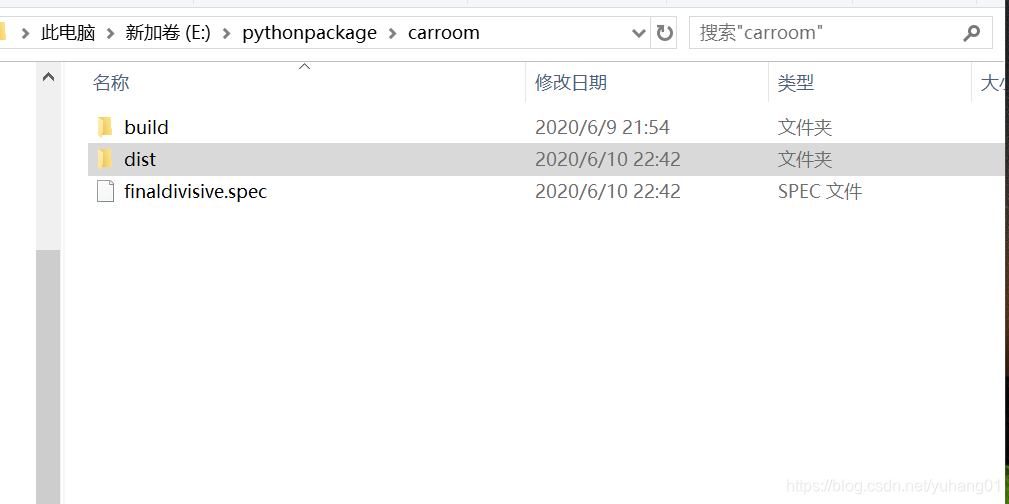
执行完成后,将会生成dist和build两个文件夹。(文件生成位置与cmd起始位置有关)其中 ,build 目录是 pyinstaller存储临时文件的目录,可以安全删除。最终的打包程序在dist内部的finaldivisive文件夹下
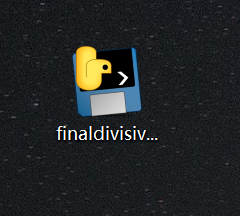
这个就是我生成的exe文件了pyinstaller -F -w E:pythonapptkinterwodiufinaldivisive.py
本网页所有视频内容由 imoviebox边看边下-网页视频下载, iurlBox网页地址收藏管理器 下载并得到。
ImovieBox网页视频下载器 下载地址: ImovieBox网页视频下载器-最新版本下载
本文章由: imapbox邮箱云存储,邮箱网盘,ImageBox 图片批量下载器,网页图片批量下载专家,网页图片批量下载器,获取到文章图片,imoviebox网页视频批量下载器,下载视频内容,为您提供.
阅读和此文章类似的: 全球云计算
 官方软件产品操作指南 (170)


 2856
2856