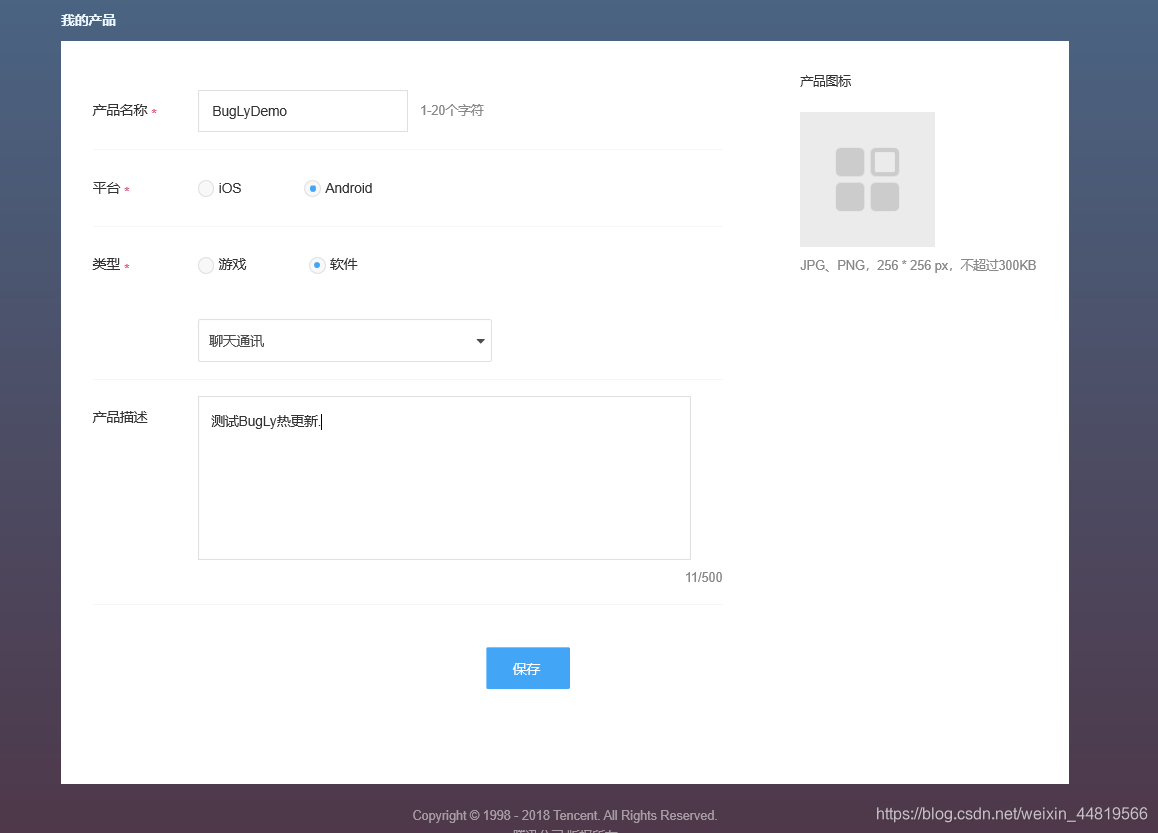
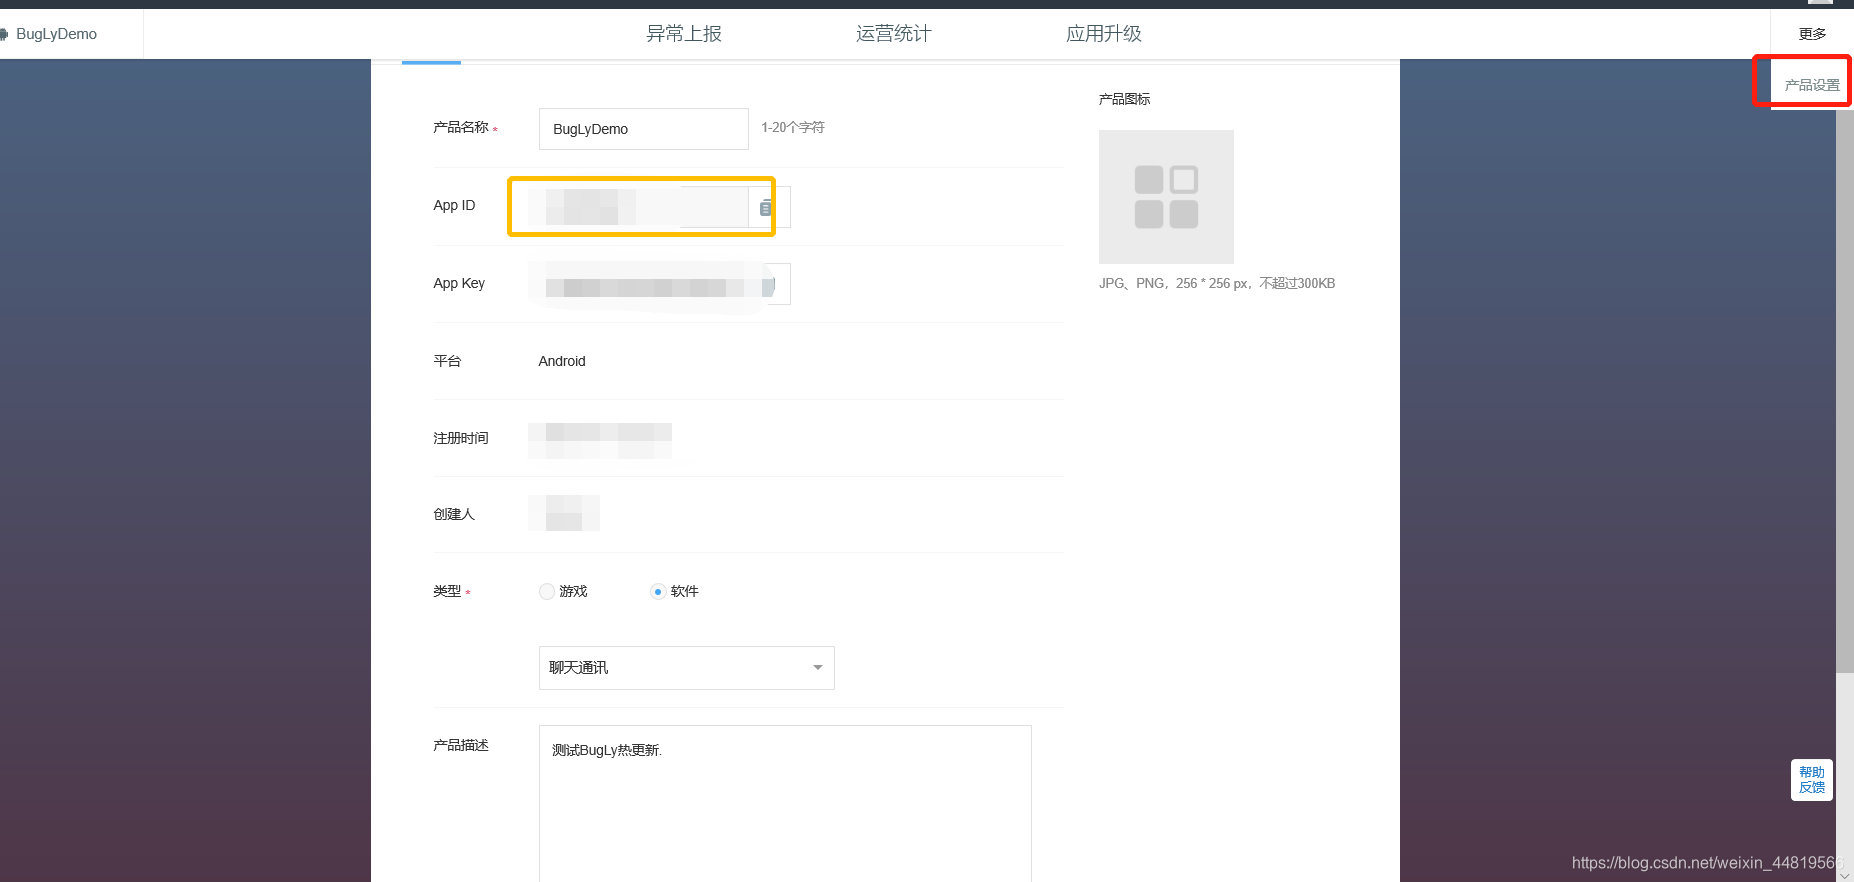
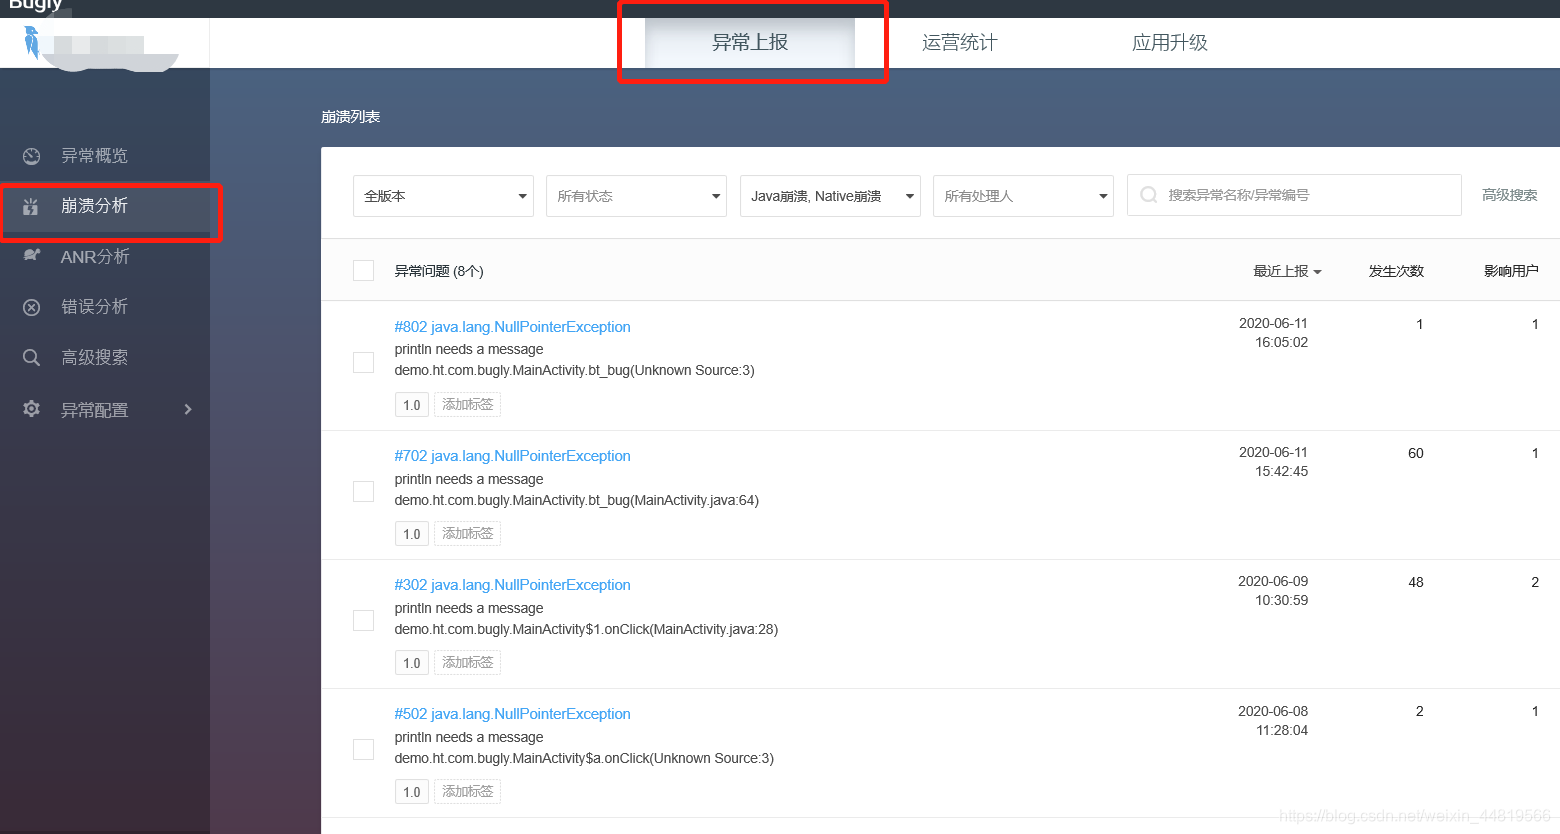
新建产品获取AppID: 产品名称随便起,(最好起你们项目的名称) 平台:Android 类型:软件 产品描述,随便写 产品创建完成之后,点击产品设置,获取AppId – 红色选中: 蓝色选中: enableProxyApplication = true情况 enableProxyApplication = false情况 切记一定要在清单文件中配置appcation. 注意: tinker-support.gradle中的tinkerId = “base-你的ID版本号” 注意: tinker-support.gradle中的tinkerId = “patch-你的ID版本号” 注意: 配置完这些之后,还可以免费找到崩溃分析,非常的好用. 谢谢大家观看,要有内部分写的有问题,请大家多多指教~
大家好,今天给大家带来BugLy热更新,热更新实现了App在毫无知觉的情况下就可以完美的修复Bug,非常的简单而且实用,接下来欢迎大家观看,满满的干货,请自备’开水’,哈哈哈哈哈~
通过配置BugLy插件,实现生成差异文件,通过BugLy脚本机制,获得补丁文件,将补丁文件上传到BugLy开放平台,然后BugLy实现免费下发补丁文件,实现热更新.
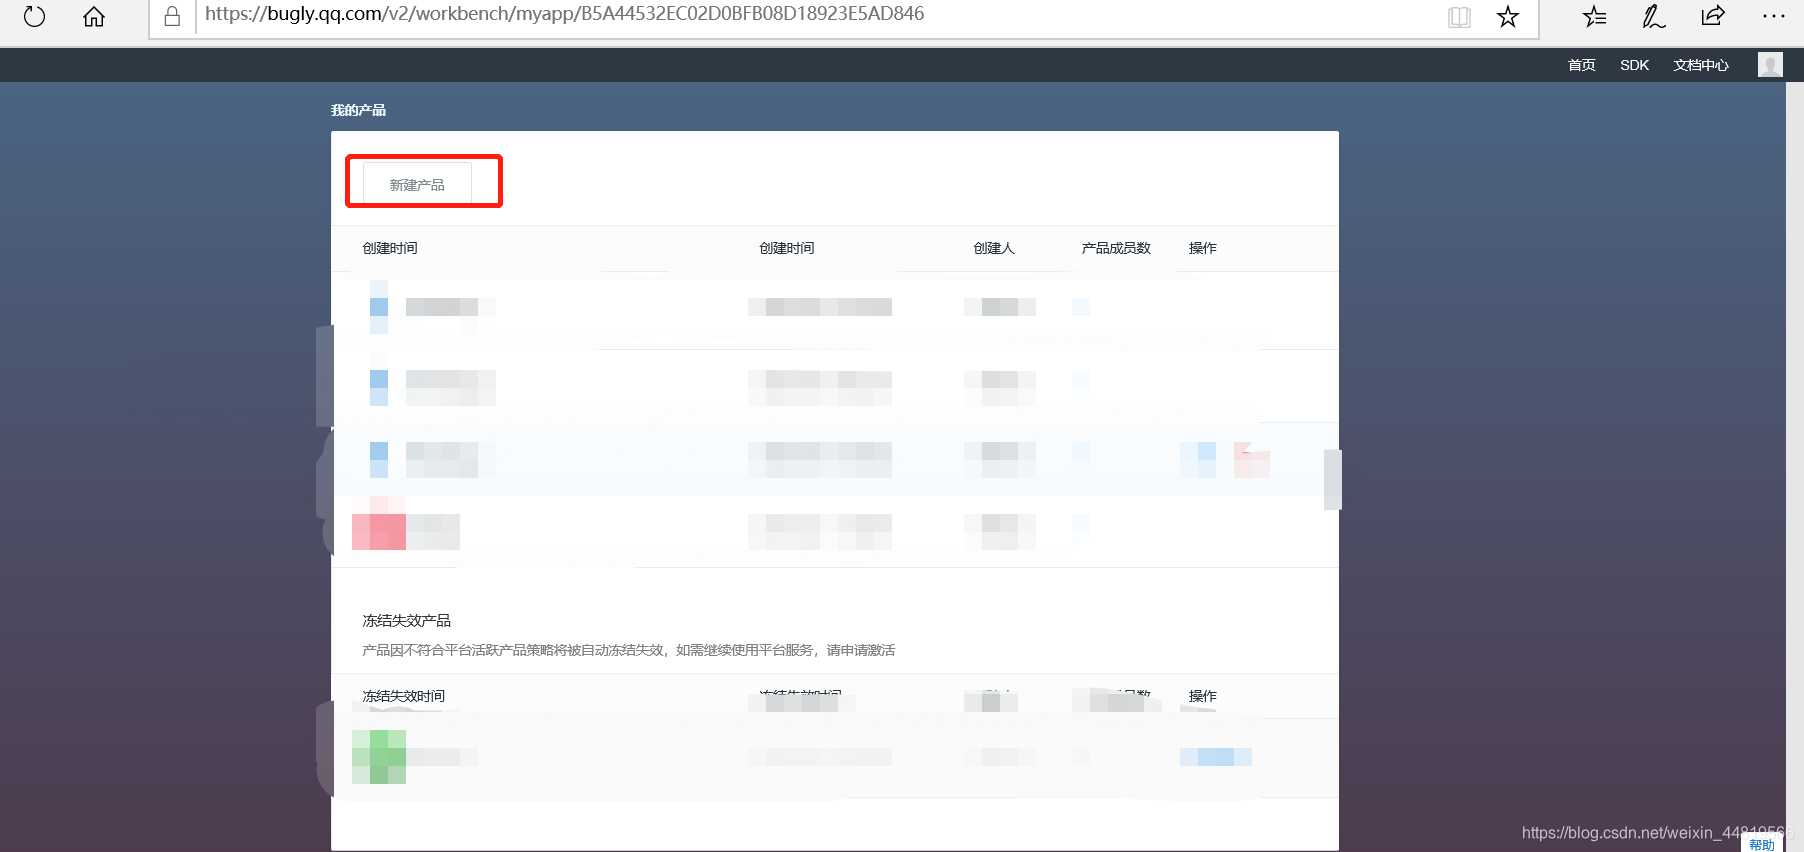
现在线上有一个app是有bug的,称之为base1.0.1,现在这个base1.0.1就作为基准包,然后修改bug,修改完之后,通过配置tinker-support.gradle设置基准包基准包,生成补丁文件,将补丁文件上传到bugly平台,bugly平台在下放到每个用户中,实现热更新.第一步:BugLy开放平台获取AppId
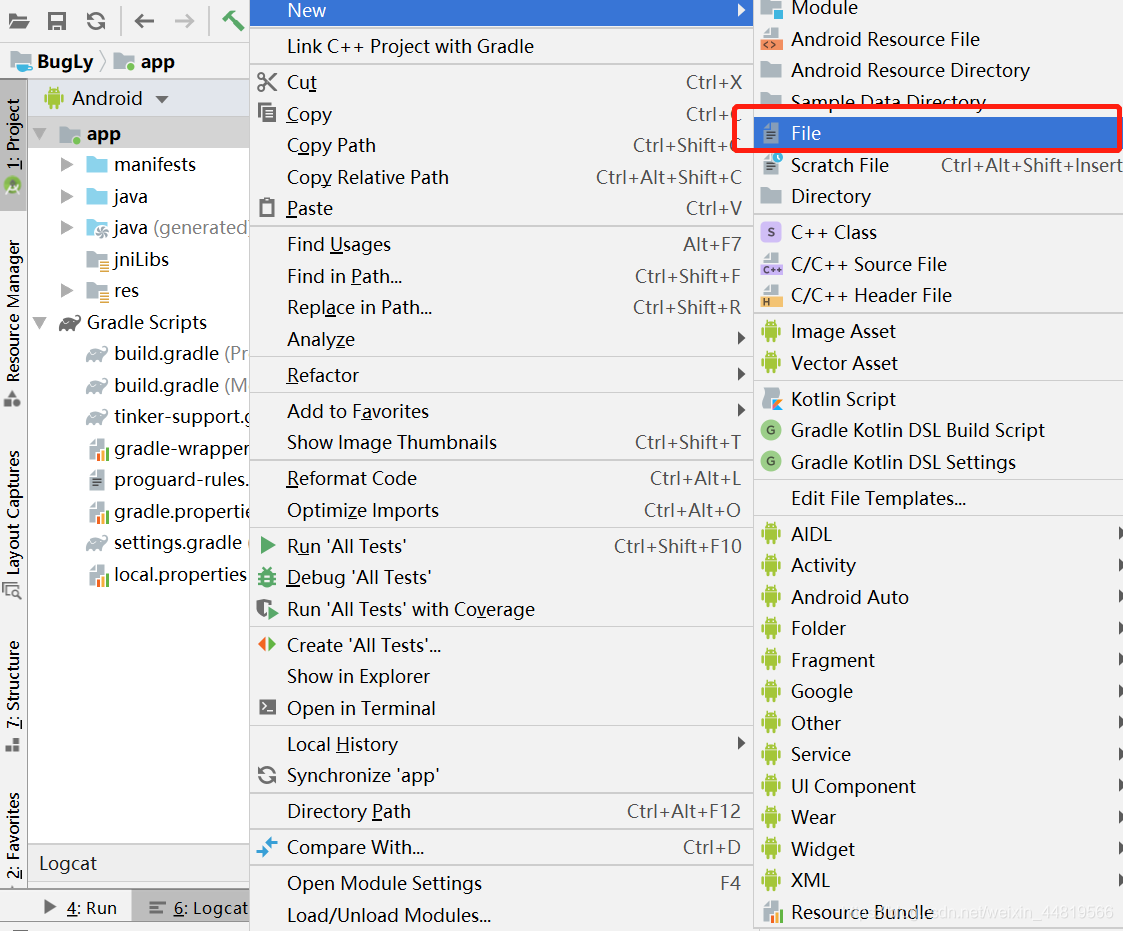
第二步:新建项目,配置BugLy插件;
// tinkersupport插件(1.0.3以上无须再配置tinker插件) classpath "com.tencent.bugly:tinker-support:1.2.0"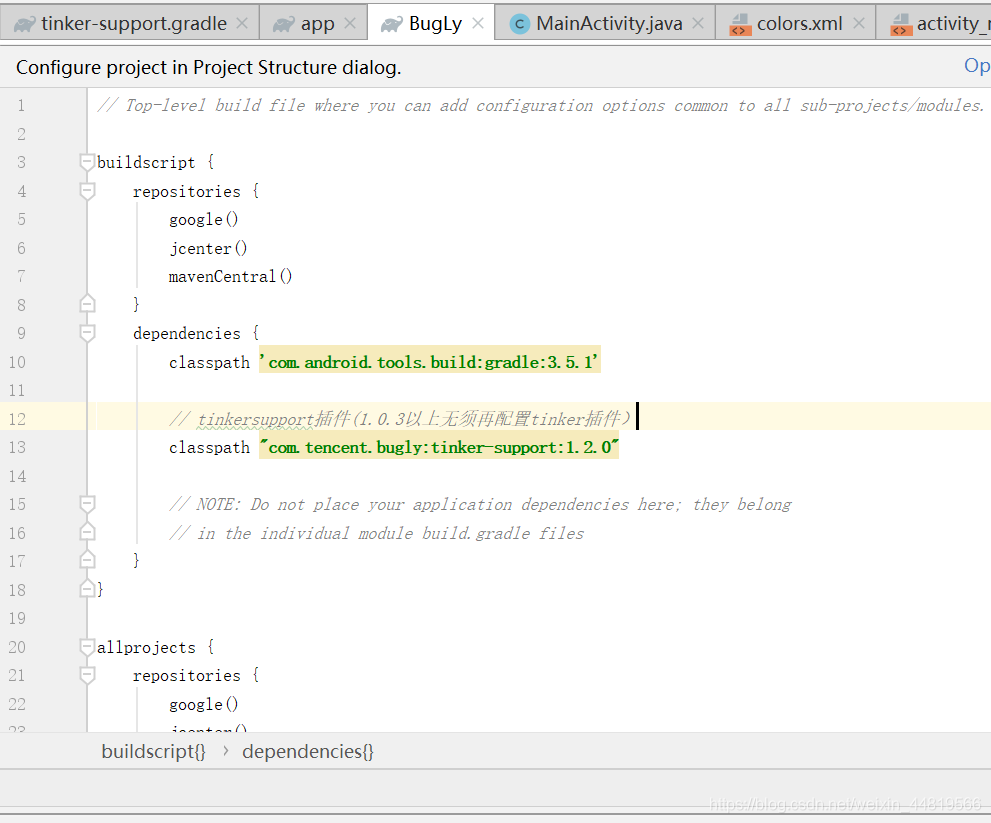
apply plugin: 'com.android.application' // 依赖插件脚本 apply from: 'tinker-support.gradle' android { compileSdkVersion 29 buildToolsVersion "29.0.3" defaultConfig { applicationId "demo.ht.com.bugly" minSdkVersion 19 targetSdkVersion 29 versionCode 16 versionName "1.0" testInstrumentationRunner "androidx.test.runner.AndroidJUnitRunner" multiDexEnabled true javaCompileOptions { annotationProcessorOptions { includeCompileClasspath = true } } //配置支持的bugly so架构 ndk { //设置支持的SO库架构 abiFilters 'armeabi' //, 'x86', 'armeabi-v7a', 'x86_64', 'arm64-v8a' } } compileOptions { sourceCompatibility JavaVersion.VERSION_1_8 targetCompatibility JavaVersion.VERSION_1_8 } // dexOptions{ jumboMode = true; } //配置签名文件 signingConfigs { create("release") { keyAlias 'bugly' keyPassword '123456' storeFile file('bugly.jks') storePassword '123456' storeType "jks" } } aaptOptions { cruncherEnabled = false useNewCruncher = false } buildTypes { release { //优化png图片 crunchPngs true // //开启资源压缩(先去除无用资源,然后进行资源压缩,条件是混淆必须首先开启,不开启则没用) shrinkResources true //开启混淆 minifyEnabled true // // 不显示Log buildConfigField "boolean", "LOG_DEBUG", "false" // //Zipalign优化 zipAlignEnabled true debuggable false // 配置混淆文件 proguardFiles getDefaultProguardFile('proguard-android-optimize.txt'), 'proguard-rules.pro' signingConfig signingConfigs.release } debug { minifyEnabled false debuggable true proguardFiles getDefaultProguardFile('proguard-android-optimize.txt'), 'proguard-rules.pro' signingConfig signingConfigs.debug } } sourceSets { main{ jniLibs.srcDirs = ['libs'] } } } dependencies { implementation fileTree(dir: 'libs', include: ['*.jar']) implementation 'androidx.appcompat:appcompat:1.1.0' implementation 'androidx.constraintlayout:constraintlayout:1.1.3' testImplementation 'junit:junit:4.12' androidTestImplementation 'androidx.test.ext:junit:1.1.1' androidTestImplementation 'androidx.test.espresso:espresso-core:3.2.0' // 多dex配置 implementation "com.android.support:multidex:1.0.1" // 集成Bugly热更新aar(本地集成使用方式) //compile(name: 'bugly_crashreport_upgrade-1.3.2', ext: 'aar') // 远程仓库集成方式(推荐) //compile 'com.tencent.bugly:crashreport_upgrade:1.3.8' implementation 'com.tencent.bugly:crashreport_upgrade:latest.release' //1. 指定tinker依赖版本(注:应用升级1.3.5版本起,不再内置tinker) //2.为了便于解答问题,这里的tinker版本建议跟随此处demo设置,如果微信更新了tinker版本,bugly会定期同步更新 implementation 'com.tencent.tinker:tinker-android-lib:1.9.14.3' implementation 'com.tencent.bugly:nativecrashreport:latest.release' // walle(多渠道使用) // compile 'com.meituan.android.walle:library:1.1.3' }
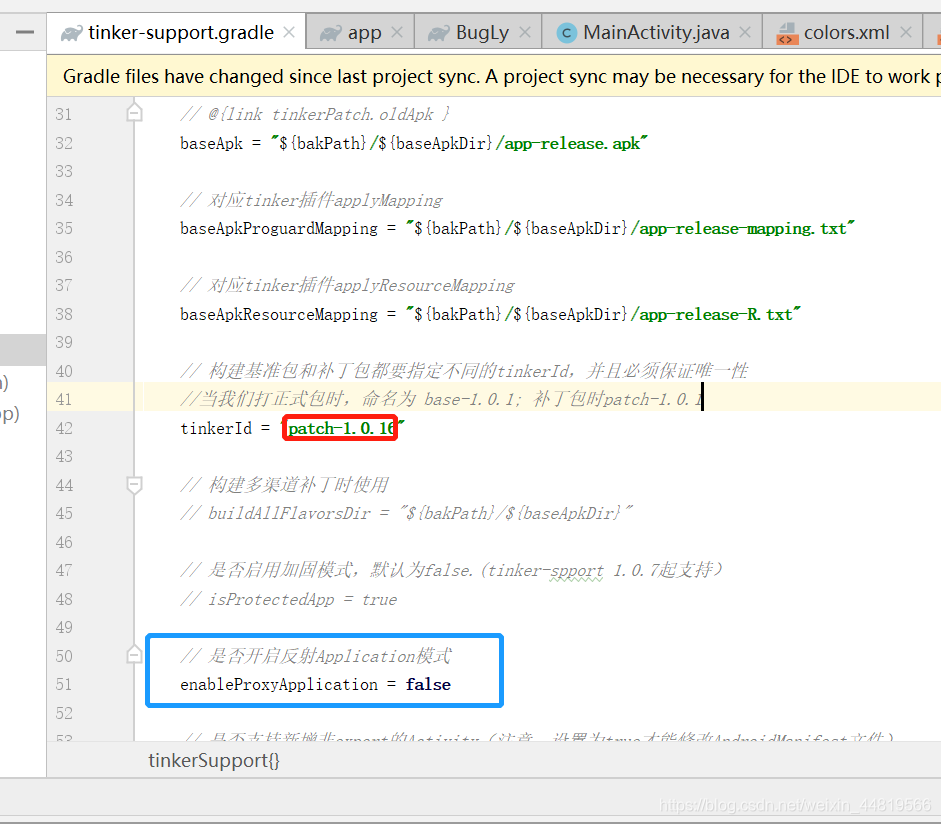
apply plugin: 'com.tencent.bugly.tinker-support' def bakPath = file("${buildDir}/bakApk/") /** * 此处填写每次构建生成的基准包目录, * 这个目录的命名是自己的正式包的目录,当我们进行热更新时打包时,该build会首先在这个目录下寻找我们 * 要发布插件的app,如果找不到这个目录或者找不到apk,就会打包失败 */ def baseApkDir = "app-0611-16-00-29" /** * 对于插件各参数的详细解析请参考 */ tinkerSupport { // 开启tinker-support插件,默认值true enable = true // tinkerEnable功能开关 tinkerEnable = true // 指定归档目录,默认值当前module的子目录tinker autoBackupApkDir = "${bakPath}" //这个是自动管理TinkerId,我们就不用自己是管理TinkerId了 autoGenerateTinkerId = true // 是否启用覆盖tinkerPatch配置功能,默认值false // 开启后tinkerPatch配置不生效,即无需添加tinkerPatch overrideTinkerPatchConfiguration = true // 编译补丁包时,必需指定基线版本的apk,默认值为空 // 如果为空,则表示不是进行补丁包的编译 // @{link tinkerPatch.oldApk } baseApk = "${bakPath}/${baseApkDir}/app-release.apk" // 对应tinker插件applyMapping baseApkProguardMapping = "${bakPath}/${baseApkDir}/app-release-mapping.txt" // 对应tinker插件applyResourceMapping baseApkResourceMapping = "${bakPath}/${baseApkDir}/app-release-R.txt" // 构建基准包和补丁包都要指定不同的tinkerId,并且必须保证唯一性 //当我们打正式包时,命名为 base-1.0.1; 补丁包时patch-1.0.1 tinkerId = "patch-1.0.16" // 构建多渠道补丁时使用 // buildAllFlavorsDir = "${bakPath}/${baseApkDir}" // 是否启用加固模式,默认为false.(tinker-spport 1.0.7起支持) // isProtectedApp = true // 是否开启反射Application模式 enableProxyApplication = false // 是否支持新增非export的Activity(注意:设置为true才能修改AndroidManifest文件) supportHotplugComponent = true } /** * 一般来说,我们无需对下面的参数做任何的修改 * 对于各参数的详细介绍请参考: * https://github.com/Tencent/tinker/wiki/Tinker-%E6%8E%A5%E5%85%A5%E6%8C%87%E5%8D%97 */ tinkerPatch { //oldApk ="${bakPath}/${appName}/app-release.apk" ignoreWarning = false useSign = true dex { dexMode = "jar" pattern = ["classes*.dex"] loader = [] } lib { pattern = ["lib/*/*.so"] } res { pattern = ["res/*", "r/*", "assets/*", "resources.arsc", "AndroidManifest.xml"] ignoreChange = [] largeModSize = 100 } packageConfig { } sevenZip { zipArtifact = "com.tencent.mm:SevenZip:1.1.10" // path = "/usr/local/bin/7za" } buildConfig { keepDexApply = false //tinkerId = "1.0.1-base" //applyMapping = "${bakPath}/${appName}/app-release-mapping.txt" // 可选,设置mapping文件,建议保持旧apk的proguard混淆方式 //applyResourceMapping = "${bakPath}/${appName}/app-release-R.txt" // 可选,设置R.txt文件,通过旧apk文件保持ResId的分配 } } -注意:
public class MyApplication extends Application { @Override public void onCreate() { super.onCreate(); // 这里实现SDK初始化,appId替换成你的在Bugly平台申请的appId // 调试时,将第三个参数改为true Bugly.init(this, "你的Appid", false); } @Override protected void attachBaseContext(Context base) { super.attachBaseContext(base); // you must install multiDex whatever tinker is installed! MultiDex.install(base); // 安装tinker Beta.installTinker(); } }
public class SampleApplication extends TinkerApplication { public SampleApplication() { /** * 参数1:tinkerFlags 表示Tinker支持的类型 dex only、library only or all suuport, * default: TINKER_ENABLE_ALL,支持全部类型 * 参数2:delegateClassName Application代理类 这里填写你自定义的ApplicationLike * 参数3:loaderClassName Tinker的加载器,使用默认即可 * 参数4:tinkerLoadVerifyFlag 加载dex或者lib是否验证md5,默认为false */ 注意这里需要改为appcationid super(ShareConstants.TINKER_ENABLE_ALL, "{applicationId}.SampleApplicationLike", "com.tencent.tinker.loader.TinkerLoader", false); } }
public class SampleApplicationLike extends DefaultApplicationLike { public static final String TAG = "Tinker.SampleApplicationLike"; public SampleApplicationLike(Application application, int tinkerFlags, boolean tinkerLoadVerifyFlag, long applicationStartElapsedTime, long applicationStartMillisTime, Intent tinkerResultIntent) { super(application, tinkerFlags, tinkerLoadVerifyFlag, applicationStartElapsedTime, applicationStartMillisTime, tinkerResultIntent); } @Override public void onCreate() { super.onCreate(); Beta.autoInit = true; Beta.autoCheckUpgrade = true; // // 设置是否开启热更新能力,默认为true Beta.enableHotfix = true; // // 设置是否自动下载补丁,默认为true Beta.canAutoDownloadPatch = true; // // 设置是否自动合成补丁,默认为true Beta.canAutoPatch = true; // // 设置是否提示用户重启,默认为false Beta.canNotifyUserRestart = true; // // 设置开发设备,默认为false,上传补丁如果下发范围指定为“开发设备”,需要调用此接口来标识开发设备 Bugly.setIsDevelopmentDevice(getApplication(), true); // 这里实现SDK初始化,appId替换成你的在Bugly平台申请的appId // 调试时,将第三个参数改为true Bugly.init(getApplication(), "你的appid", true); } @TargetApi(Build.VERSION_CODES.ICE_CREAM_SANDWICH) @Override public void onBaseContextAttached(Context base) { super.onBaseContextAttached(base); // you must install multiDex whatever tinker is installed! MultiDex.install(base); // 安装tinker // TinkerManager.installTinker(this); 替换成下面Bugly提供的方法 Beta.installTinker(this); } @TargetApi(Build.VERSION_CODES.ICE_CREAM_SANDWICH) public void registerActivityLifecycleCallback(Application.ActivityLifecycleCallbacks callbacks) { getApplication().registerActivityLifecycleCallbacks(callbacks); } @Override public void onTerminate() { super.onTerminate(); Beta.unInit(); } }第三步:生成基准包
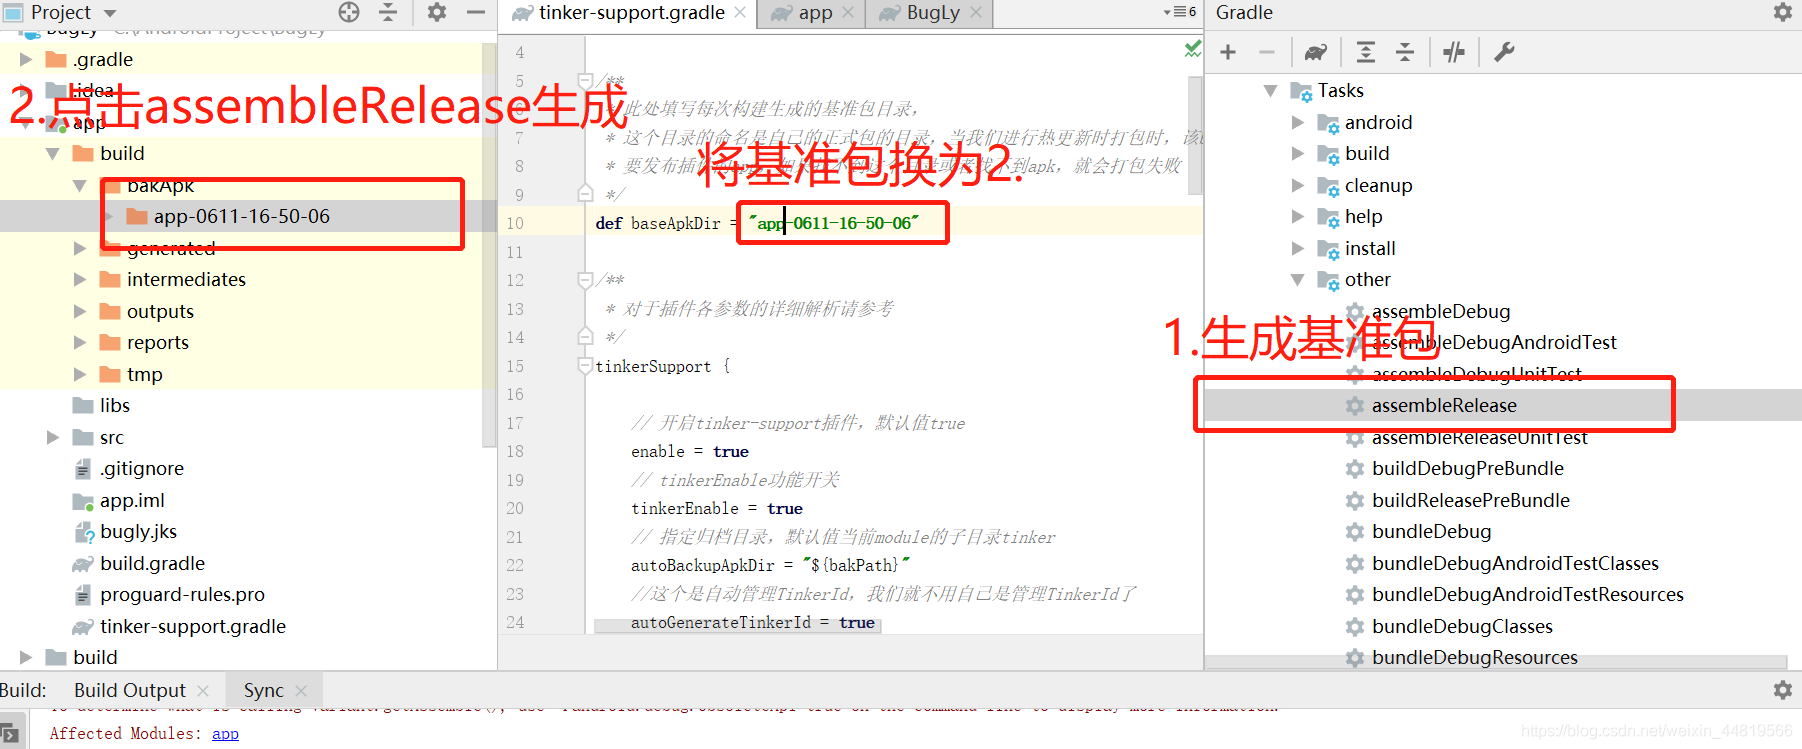
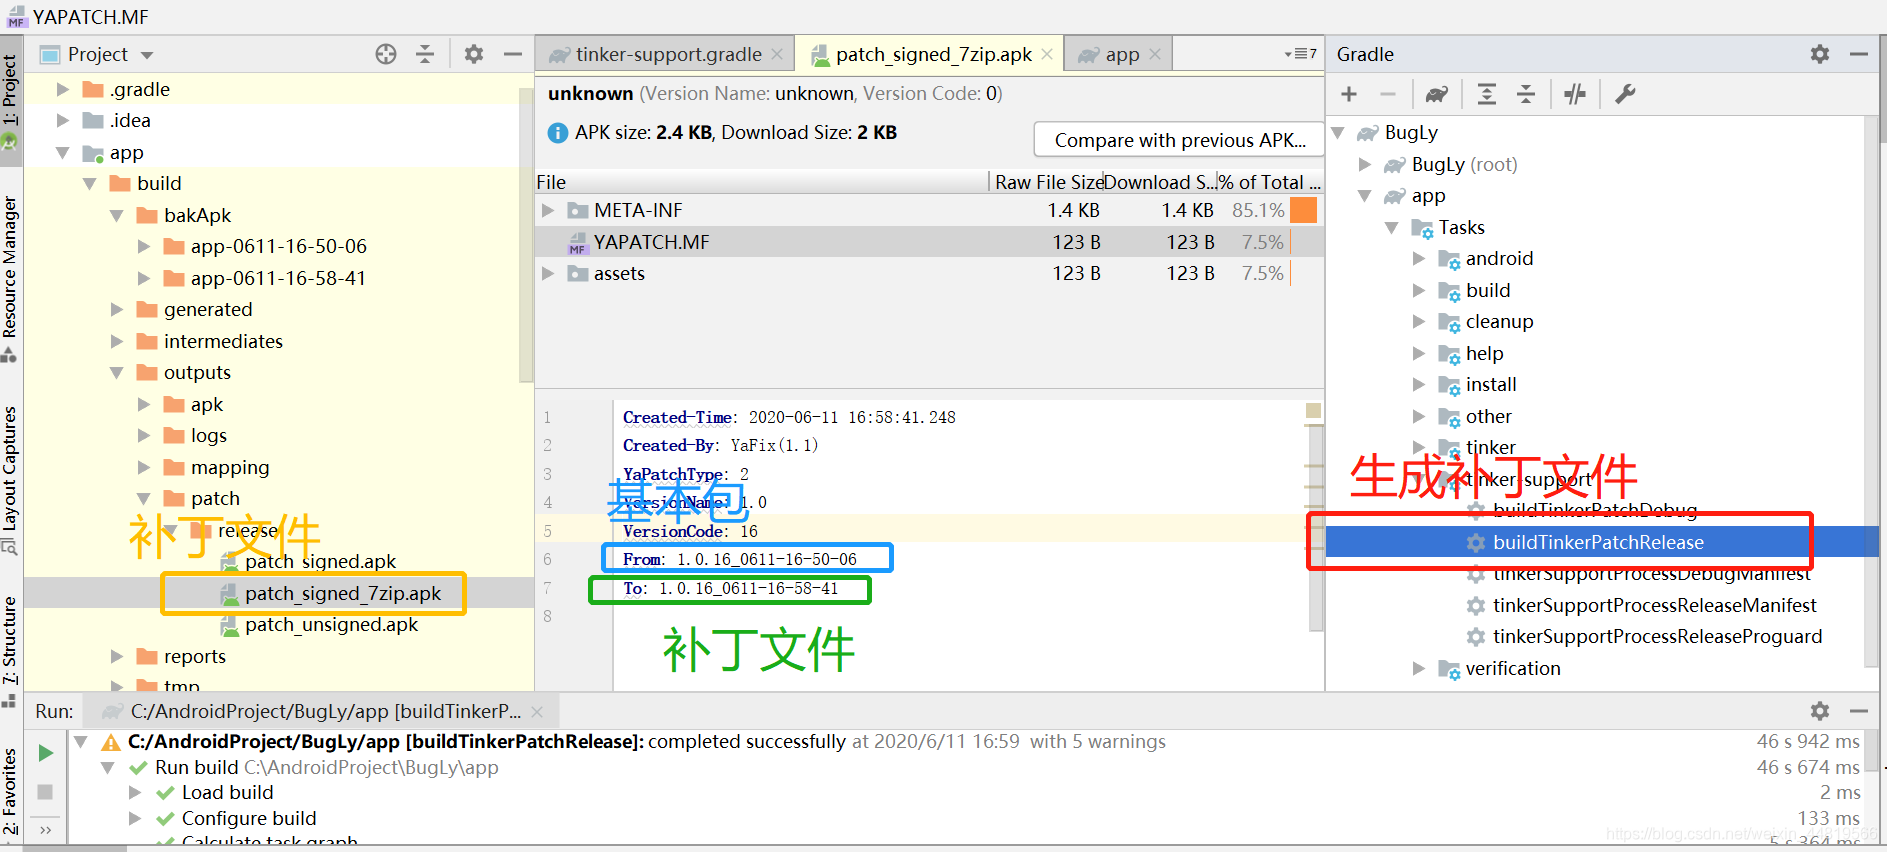
第四步:生成补丁文件:
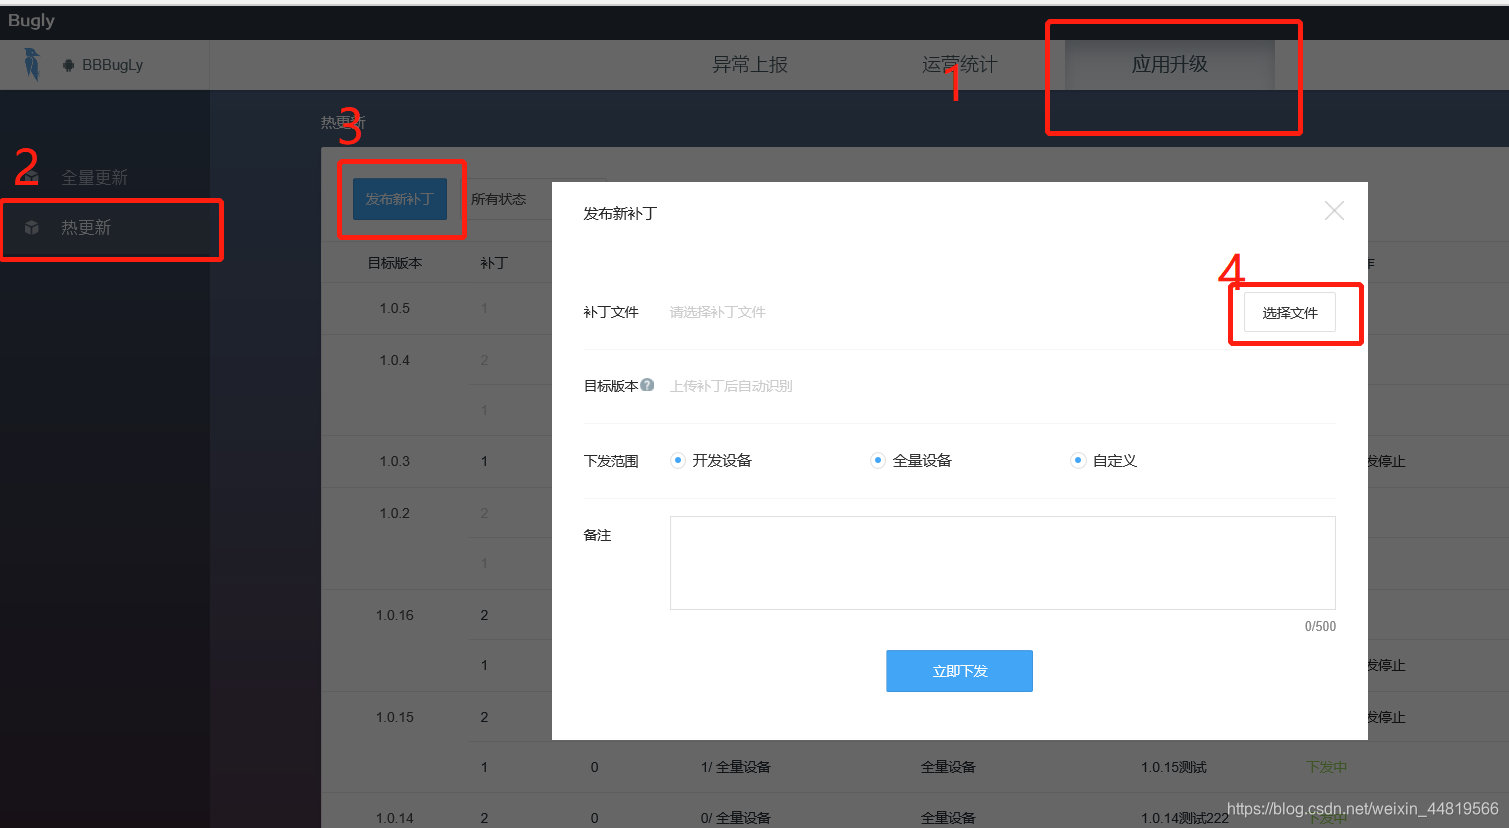
第五步:上传补丁文件到BugLy开放平台
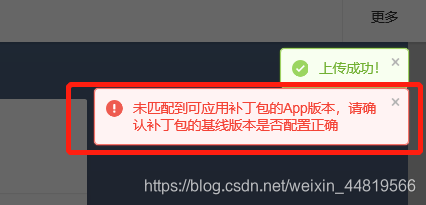
有的同学可能碰到这样的问题,这个问题是应为你的基准包没有上报联网,需要先把你的基准包在手机上安装上,然后运行一下,最后再次上传即可.
上传完成之后,重新启动APP即可完成热更新.
配置BugLy中遇到的问题:
小彩蛋
Git地址: langyangyang.
本网页所有视频内容由 imoviebox边看边下-网页视频下载, iurlBox网页地址收藏管理器 下载并得到。
ImovieBox网页视频下载器 下载地址: ImovieBox网页视频下载器-最新版本下载
本文章由: imapbox邮箱云存储,邮箱网盘,ImageBox 图片批量下载器,网页图片批量下载专家,网页图片批量下载器,获取到文章图片,imoviebox网页视频批量下载器,下载视频内容,为您提供.
阅读和此文章类似的: 全球云计算
 官方软件产品操作指南 (170)


 4814
4814