本文章侧重实战,是为线上系统做的一个demo。适合对oauth2有一定理解后再阅读。 首先来看授权码认证模式的一个流程图: 通过认证流程我们已经看到了,整个权限认证系统分为几个角色。这里我们把他们分为3个角色:客户端、认证服务器和资源服务器。 之后我们来介绍一下在这个demo中我要实现的功能,主要有以下两点: 总结一下,我们要实现两个功能,一个是认证之后拉数据,一个是认证之后推数据。拉数据比较好理解,就是访问接口获取数据,推数据的话就是我们推当前登录人的一些用户信息,之后资源服务器拿到数据之后判断他是否注册,注册了的话就重定向到一个隐藏表单自动提交的页面,完成登录。 项目中用到的独立于oauth2流程的技术点,先单独介绍一下。 我们在项目中集成SpringSecurity,其中客户端和资源服务器我们自定义了登录页面,将账号密码存入数据库中,通过表单提交的方式完成登录。 首先来看Config类: 上面的代码中注释已经很详细了,有一个地方需要特别注意,一定要把登录页面设置为不通过登录验证就可以访问,否则会一直被重定向。 配置文件: 把页面放在/templates文件下就可以了。 可以看到是一个很简单的表单提交页面,表单的action为 引入如果没有做登录信息入库,我们可以在配置文件中设置账号密码: 但这样显然是和实际场景相差甚远的,我们来配置一下将账号密码入库。 application.yml中配置: 注意不要忘记开启驼峰命名。 接下来我们建一个简单的用户表: 分别是用户名,密码和权限,权限部分不可为空,随意填即可。 可以看到我们使用了一个 我们在这个类中做的事情,就是根据我们登录时提交的用户名在数据库中查询得到用户名、密码和权限,之后把他们存入session并进行相应的验证。 其中tk.mybatis是一个非常好用的依赖,这里简单介绍一下。 引入了它我们可以在mapper中继承父类: 这里注意Mapper的泛型要是实体类,同时实体类要按规范来写。 同时我们需要在springboot的启动类上加mapper的扫描注解: 注意,如果配置了上面说的tk.mybatis通用mapper,启动类的MapperScan包需要更改为: 之后可以调用许多很实用的api,如selectByPrimaryKey(),insert()等方法来实现查询和插入操作。 之后我们来完成认证服务器的配置。 整个配置文件实现了两部分功能:配置client信息入库存储,配置access_token等令牌信息持久化到redis中。我们分别来进行介绍。 在上面的配置文件中我们可以看到注释中的内容,调用 我填写的信息如下图所示: 如果不进行持久化配置,客户端的access_token等信息是存储在内存中的,如果服务挂掉所有的信息就都消失了,因此我们需要将这些信息做持久化存储。可以选择的方案有使用 配置文件: ①获取code 具体请求,需要携带四个参数: https://localhost:8080/oauth/authorize?client_id=clientapp&redirect_uri=https://www.baidu.com&response_type=code&scope=server 之后授权服务器会做一个重定向,到我们指定的redirect_uri,同时携带一个参数code https://www.baidu.com/?code=gCWpZE ②授权码模式获取access_token等令牌信息 访问地址:https://localhost:8080/oauth/token 得到的返回值: ③刷新令牌模式获取access_token等令牌信息 路径与授权码模式相同,需要将body传递的参数修改为: 返回值与授权码模式相同 因为这个demo我们做了资源服务器与授权服务器分离处理,因此资源服务器在收到 资源服务器的登录功能不再重复赘述,这里贴出访问受保护资源有关的配置文件,之后我们拆解来说: 这里我们是配置了对以/resource开头的访问请求开启权限认证,也就是说如果访问/resource的保护资源,必须要在请求头中添加正确拼装且没有失效的令牌才可以获取数据。 我们使用 这里我们重点看 客户端我们做的事情主要是通过 这里我们写了一个简单的前端页面,跳转访问授权服务器的授权接口: 写一个接收重定向请求的controller: 上面做的主要分为两步,第一步是通过RestTemplate拼装相应的参数来获取令牌信息,第二步是把令牌信息入库持久化。 这里我们搞了一个非常简单的数据库,实际工作中至少应该expires_in转换为到期时间,或者通过redis来存储令牌信息。 可以看到我们是想访问资源服务器的受保护资源: 我们拼装了一个 这里是工作中的一个需求,听起来比较奇怪,实际上就是推送客户端当前的登录用户信息给资源服务器,资源服务器实现登录。 多了一步session中拿当前登录用户信息,实际工作中这里应该是拿用户名和一个唯一标识,不是密码的明文传输。 这里我们是在 这里我们拿到了客户端传过来的用户名和密码,将参数赋值到隐藏表单中,提交表单到资源服务器的
一、前言
如果对oauth2理解还不够深入,建议先阅读芋道 Spring Security Oauth2入门来夯实一下基础。
这个demo主要实现了资源服务器与授权服务器分离,client信息入库,token信息在redis中持久化,demo的github地址会在文末贴出。二、oAuth2授权码模式认证流程
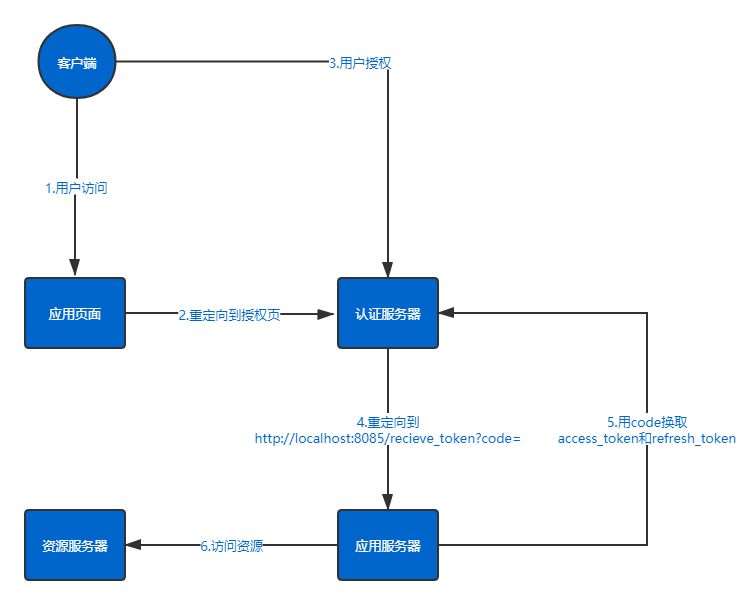
这里我们将过程分为几个步骤:
1.用户访问应用页面
这里我们可以理解为用户访问的页面或数据资源需要去资源服务器拿,此时我们还没有授权,无法访问。
2.重定向到授权页
这个步骤我们可以主动跳转,也可以在访问应用页面时判断是否授权,如果没授权的话就重定向到授权页面。
3.用户授权
我们访问授权认证服务器,传递参数code,redirect_uri,response_type,scope,如果认证成功,页面会被重定向。
4.重定向
之后页面会重定向到一个我们在方法参数中指定的重定向地址redirect_uri,同时将code作为参数返回。
5.获取access_token
我们传递code等参数,访问/oauth/token页面进行认证。得到access_token,授权认证就完成了。
6.访问资源
之后我们把access_token作为请求头,就可以成功访问资源服务器的资源了。三、权限认证系统的三个角色
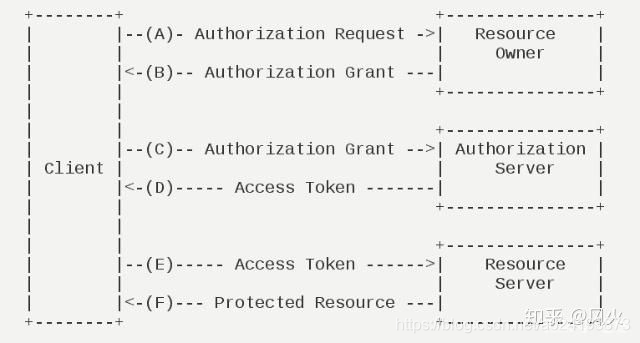
这张图是Oauth2官方的一张规范图。小伙伴们都发现了,这明明就是四个角色。
在这张图中client客户端实际指的是浏览器,也就是我们的用户端。在我上面的定义中客户端实际上是这张图里的Resource Owner,授权服务器是Authorization Server,资源服务器是Resource Server。四、demo实现的功能
1.客户端通过授权认证后,访问资源服务器获取资源。 2.客户端通过授权认证后,访问资源服务器相应接口推送客户端的登录信息,之后完成资源服务器的登录。
因此在这个demo中,三个项目都需要配置SpringSecurity,客户端与资源服务器是用来登录,认证服务器是用来集成SpringSecurityOauth2。五、技术点
1.SpringSecurity自定义登录页面,账密信息入库
首先我们引入SpringSecurity的依赖:<!-- security --> <dependency> <groupId>org.springframework.boot</groupId> <artifactId>spring-boot-starter-security</artifactId> </dependency> 配置自定义登录页面
@EnableWebSecurity @EnableGlobalMethodSecurity(prePostEnabled = true) @Configuration public class WebSecurityConfig extends WebSecurityConfigurerAdapter { @Override protected void configure(HttpSecurity http) throws Exception { http.csrf().disable() .formLogin() .loginPage("/portal/login")//用户未登录时,访问任何资源都转跳到该路径,即登录页面 .loginProcessingUrl("/login")//登录表单form中action的地址,也就是处理认证请求的路径 .defaultSuccessUrl("/portal/index",true)//登录认证成功后默认转跳的路径,第二个参数为true则任何情况都跳到指定url。否则会先跳到referer,referer为空才跳到指定url .usernameParameter("username")///登录表单form中用户名输入框input的name名,不修改的话默认是username .passwordParameter("password")//form中密码输入框input的name名,不修改的话默认是password .and() .authorizeRequests() .antMatchers("/portal/login","/portal/index").permitAll()//不需要通过登录验证就可以被访问的资源路径 .anyRequest().authenticated(); } }
这里我们指定的登录页面是/portal/login登录之后重定向到首页/portal/index,这里我们集成了springMVC和freemarker来展示前端页面,依赖:<!-- WEB --> <dependency> <groupId>org.springframework.boot</groupId> <artifactId>spring-boot-starter-web</artifactId> </dependency> <dependency> <groupId>org.springframework.boot</groupId> <artifactId>spring-boot-starter-freemarker</artifactId> </dependency> spring: resources: static-locations: classpath:/ freemarker: template-loader-path: classpath:/templates/ suffix: .html content-type: text/html charset: UTF-8
登录页面代码:<!DOCTYPE html> <html lang="en"> <head> <meta charset="UTF-8"/> <title>Title</title> </head> <body> <h1>客户端</h1> <form action="/login" id="fm1" method="post"> <div class="login-mmdl"> <div class="login-input"> <div> <span>用户名:</span><input id="username" name="username" onkeyup="keyup();" placeholder="请输入用户名手机号" type="text" /> </div> <div> <span>密码:</span><input id="password" name="password" placeholder="请输入密码" type="password" /> </div> </div> <button class="login-btn-dl text-white" href="javascript:;" id="username_password" onclick="login();">登 录</button> </div> </form> </body> <script> function login(){ $("fm1").submit(); } </script> </html> /login。账密信息入库
security.user.name=qbq security.user.password=1024
首先我们引入数据库相关依赖:<!-- 数据库相关 --> <dependency> <groupId>org.mybatis.spring.boot</groupId> <artifactId>mybatis-spring-boot-starter</artifactId> <version>1.3.1</version> </dependency> <dependency> <groupId>mysql</groupId> <artifactId>mysql-connector-java</artifactId> <scope>runtime</scope> </dependency> spring: datasource: url: jdbc:mysql://localhost:3306/zfc_test?useUnicode=true&characterEncoding=utf-8&useSSL=false username: root password: root driver-class-name: com.mysql.jdbc.Driver mybatis: configuration: map-underscore-to-camel-case: true #开启下划线转换驼峰命名
在启动类上加MapperScan:@SpringBootApplication @MapperScan("com.quan.client.Mapper") public class ClientApplication { public static void main(String[] args) { SpringApplication.run(ClientApplication.class, args); } } CREATE TABLE `test_user` ( `user_name` varchar(255) NOT NULL, `password` varchar(255) DEFAULT NULL, `user_desc` varchar(255) DEFAULT NULL, PRIMARY KEY (`user_name`) ) ENGINE=InnoDB DEFAULT CHARSET=utf8 ROW_FORMAT=COMPACT;
如下图所示:

在刚才的配置类中我们新增如下配置: @Autowired @Qualifier("databaseUserDetailService") private DataBaseUserDetailService userDetailsService; @Override protected void configure(AuthenticationManagerBuilder auth) throws Exception { auth.userDetailsService(userDetailsService); } DataBaseUserDetailService类,这个类是我们定义在service层中的,代码如下:@Service("databaseUserDetailService") @Transactional public class DataBaseUserDetailService implements UserDetailsService { @Autowired private TestUserMapper testUserMapper; @Override public UserDetails loadUserByUsername(String userName) throws UsernameNotFoundException { TestUser testUser = testUserMapper.findAllByUserName(userName); if(testUser==null){ throw new UsernameNotFoundException("user + " + userName + "not found."); } HttpServletRequest request = ((ServletRequestAttributes) RequestContextHolder.getRequestAttributes()).getRequest(); HttpSession session = request.getSession(); session.setAttribute("username",testUser.getUserName()); session.setAttribute("password",testUser.getPassword()); List<GrantedAuthority> authorities = new ArrayList<>(); authorities.add(new SimpleGrantedAuthority(testUser.getUserDesc())); UserDetails userDetails = new User(testUser.getUserName(),testUser.getPassword(),authorities); return userDetails; } } 2.集成通用Mapper
依赖:<!-- 通用Mapper --> <dependency> <groupId>tk.mybatis</groupId> <artifactId>mapper-spring-boot-starter</artifactId> <version>2.0.2</version> </dependency> public interface TestUserMapper extends Mapper<TestUser> { }
需要加@Entity与@Table标签,table中的name要填数据库中表名。每一个字段都要加@Column(name=“user_name”)注解,name是字段名,同时主键需要添加@Id注解。
实体类:package com.quan.client.Entity; import javax.persistence.*; @Entity @Table(name = "test_user") public class TestUser { @Id @Column(name="user_name") private String userName; @Column(name="password") private String password; @Column(name="user_desc") private String userDesc; //---下面getset方法省略 } @MapperScan("com.quan.redistest.Mapper") import tk.mybatis.spring.annotation.MapperScan; 六、认证服务器
这里我们直接贴出授权服务器的完整配置类:// 授权服务器配置 @Configuration @EnableAuthorizationServer public class OAuth2AuthorizationServer extends AuthorizationServerConfigurerAdapter { @Resource private DataSource dataSource; @Autowired private AuthenticationManager authenticationManager; @Autowired private RedisConnectionFactory connectionFactory; //配置client信息入库存储 @Override public void configure(ClientDetailsServiceConfigurer clients) throws Exception { /*clients.inMemory() // // begin ... .withClient("clientapp").secret("112233") // Client 账号、密码。 .redirectUris("https://localhost:8080/resource/callBack") // 配置回调地址,选填。 .authorizedGrantTypes("authorization_code","refresh_token") // 授权码模式 .scopes("server", "select") // 可授权的 Scope .accessTokenValiditySeconds(1200) .refreshTokenValiditySeconds(2400);*/ //client入库 oauth_client_details clients.withClientDetails(clientDetails()); } @Override public void configure(AuthorizationServerSecurityConfigurer security) throws Exception { security // 开启/oauth/token_key验证端口无权限访问 .tokenKeyAccess("permitAll()") .checkTokenAccess("permitAll()") // 请求/oauth/token的,如果配置支持allowFormAuthenticationForClients的,且url中有client_id和client_secret的会走ClientCredentialsTokenEndpointFilter .allowFormAuthenticationForClients(); } @Bean public ClientDetailsService clientDetails() { return new JdbcClientDetailsService(dataSource); } //配置access_token等信息持久化到redis中 @Override public void configure( AuthorizationServerEndpointsConfigurer endpoints) throws Exception { endpoints .authenticationManager(authenticationManager) .tokenStore(tokenStore()); } @Bean public TokenStore tokenStore(){ final RedisTokenStore redisTokenStore = new RedisTokenStore(connectionFactory); //redisTokenStore.setPrefix("token-"); return redisTokenStore; } } 1.配置client信息入库存储
clients.inMemory()进行配置,client的信息是从内存中加载的,现在我们需要将这些信息入库存储,数据库表如下:CREATE TABLE `oauth_client_details` ( `client_id` varchar(48) NOT NULL, `resource_ids` varchar(256) DEFAULT NULL, `client_secret` varchar(256) DEFAULT NULL, `scope` varchar(256) DEFAULT NULL, `authorized_grant_types` varchar(256) DEFAULT NULL, `web_server_redirect_uri` varchar(256) DEFAULT NULL, `authorities` varchar(256) DEFAULT NULL, `access_token_validity` int(11) DEFAULT NULL, `refresh_token_validity` int(11) DEFAULT NULL, `additional_information` varchar(4096) DEFAULT NULL, `autoapprove` varchar(256) DEFAULT NULL, PRIMARY KEY (`client_id`) ) ENGINE=InnoDB DEFAULT CHARSET=utf8;

我们设置id和secret,开启了授权码和刷新令牌两种模式,access_token过期时间设为3600秒。
不要遗漏下面的配置,将ClientDetailsService进行注入,既可以实现读取数据库表中的配置。2.配置access_token等令牌信息持久化到redis中
JdbcTokenStore 持久化到关系型数据库,和使用RedisTokenStore持久化到redis中。
因为这些令牌信息是有过期时间的,和Redis的特性相符,同时存到redis中也可以提高授权服务器的响应速度,所以我们选择持久化到redis中。
相应的配置已经写在上面的配置文件的后半部分,我们还需要把redis集成到项目中。
依赖:<!--集成redis--> <dependency> <groupId>org.springframework.boot</groupId> <artifactId>spring-boot-starter-data-redis</artifactId> <version>1.4.1.RELEASE</version> </dependency> spring.redis.host=localhost spring.redis.port=6379 spring.redis.database=0 spring.redis.password= 3.授权服务器提供的一些访问接口
/oauth/authorize
client_id,redirect_uri,response_type,scope。
这四个参数需要与oauth_client_details表中存储的client信息相对应,如有不同则会报错,无法获取code。/oauth/token
1.Basic认证:username:clientapp password:112233
2.head设置Content-Type:application/x-www-form-urlencoded
3.body传递参数:
code:刚得到的code
grant_type:authorization_code 授权码模式
redirect_uri:www.baidu.com 重定向地址
scope:server{ "access_token": "cc978538-af44-4d85-be04-743a9ad95dea", "token_type": "bearer", "refresh_token": "47e884f6-f38b-45f5-91f9-0ca2be05e0f2", "expires_in": 3599, "scope": "server" } /oauth/token refresh_token:授权码模式返回的刷新令牌,可以用来重新获得access_token grant_type:refresh_token 刷新令牌模式 redirect_uri:www.baidu.com scope:server
④资源服务器与授权服务器通信接口/oauth/check_token Authorization请求头中拼装的access_token时,需要与授权服务器通信来验证access_token信息的正确性。七、资源服务器
@Configuration @EnableResourceServer class OAuth2ResourceServer extends ResourceServerConfigurerAdapter { @Value("${client-id}") private String clientId; @Value("${client-secret}") private String clientSecret; @Override public void configure(HttpSecurity http) throws Exception { http.authorizeRequests() // 对 "/api/**" 开启认证 .anyRequest() .authenticated() .and() .requestMatchers() .antMatchers("/resource/**"); } @Override public void configure(ResourceServerSecurityConfigurer resources) { resources.tokenServices(tokenServices());//.resourceId(SPARKLR_RESOURCE_ID); } @Bean public ResourceServerTokenServices tokenServices() { RemoteTokenServices remoteTokenServices = new RemoteTokenServices(); remoteTokenServices.setCheckTokenEndpointUrl("https://localhost:8080/oauth/check_token"); //这里硬编码客户端信息,服务端硬编码保存在内存里,生产上请修改 remoteTokenServices.setClientId(clientId); remoteTokenServices.setClientSecret(clientSecret); remoteTokenServices.setRestTemplate(restTemplate()); remoteTokenServices.setAccessTokenConverter(accessTokenConverter()); return remoteTokenServices; } @Bean public RestTemplate restTemplate(){ RestTemplate restTemplate = new RestTemplate(); List<HttpMessageConverter<?>> converters = restTemplate.getMessageConverters(); for (HttpMessageConverter<?> converter : converters) { if (converter instanceof MappingJackson2HttpMessageConverter) { MappingJackson2HttpMessageConverter jsonConverter = (MappingJackson2HttpMessageConverter) converter; jsonConverter.setObjectMapper(new ObjectMapper()); List<MediaType> list = new ArrayList<MediaType>(); list.add(new MediaType("application", "json", MappingJackson2HttpMessageConverter.DEFAULT_CHARSET)); list.add(new MediaType("text", "javascript", MappingJackson2HttpMessageConverter.DEFAULT_CHARSET)); jsonConverter.setSupportedMediaTypes(list); } } return restTemplate; } @Bean public AccessTokenConverter accessTokenConverter() { return new DefaultAccessTokenConverter(); } } 1.受保护资源有关配置
@Override public void configure(HttpSecurity http) throws Exception { http.authorizeRequests() // 对 "/api/**" 开启认证 .anyRequest() .authenticated() .and() .requestMatchers() .antMatchers("/resource/**"); } 2.资源服务器与授权服务器分离配置
RemoteTokenServices来实现资源服务器与授权服务器通信 @Override public void configure(ResourceServerSecurityConfigurer resources) { resources.tokenServices(tokenServices());//.resourceId(SPARKLR_RESOURCE_ID); } @Bean public ResourceServerTokenServices tokenServices() { RemoteTokenServices remoteTokenServices = new RemoteTokenServices(); remoteTokenServices.setCheckTokenEndpointUrl("https://localhost:8080/oauth/check_token"); //这里硬编码客户端信息,服务端硬编码保存在内存里,生产上请修改 remoteTokenServices.setClientId(clientId); remoteTokenServices.setClientSecret(clientSecret); remoteTokenServices.setRestTemplate(restTemplate()); remoteTokenServices.setAccessTokenConverter(accessTokenConverter()); return remoteTokenServices; } tokenServices()方法,setCheckTokenEndpointUrl指定了与授权服务器通信检查token的url,clientId与clientSecret是资源服务器自己的id与secret,可以理解为资源服务器也是授权服务器的一个客户端,需要在oauth_client_details表中添加相应的数据。
RestTemplate的配置是配置了通信时的编码信息。
AccessTokenConverter定义了使用默认的token转换器。八、客户端
RestTemplate来对各种访问流程进行封装,由于这次demo的重点不在客户端的配置,因此相对来说客户端比较粗糙,主要是用来实现我们的一些功能演示过程。1.访问授权服务器获取令牌
<!DOCTYPE html> <html lang="en"> <head> <meta charset="UTF-8"/> <title>权限认证</title> </head> <body> <h1>权限认证</h1> <button onclick="auth();">开始权限认证</button> <script> function auth(){ window.location.href = "https://localhost:8080/oauth/authorize?client_id=clientapp&redirect_uri=https://localhost:8085/portal/receive&response_type=code&scope=server"; } </script> </body> </html> https://localhost:8080/oauth/authorize?client_id=clientapp&redirect_uri=https://localhost:8085/portal/receive&response_type=code&scope=server @RequestMapping("receive") @ResponseBody public String receive(String code) { RestTemplate restTemplate = new RestTemplate(); HttpHeaders httpHeaders = new HttpHeaders() {{ // String auth = username + ":" + password; String auth = "clientapp" + ":" + "112233"; byte[] encodedAuth = Base64.encodeBase64( auth.getBytes(Charset.forName("US-ASCII"))); String authHeader = "Basic " + new String(encodedAuth); set("Authorization", authHeader); }}; MultiValueMap<String, Object> paramMap = new LinkedMultiValueMap<String, Object>(); paramMap.add("code", code); paramMap.add("grant_type", "authorization_code"); paramMap.add("redirect_uri", "https://localhost:8085/portal/receive"); paramMap.add("scope", "server"); ResponseEntity<String> responseEntity = restTemplate.exchange ("https://localhost:8080/oauth/token", HttpMethod.POST, new HttpEntity<MultiValueMap<String, Object>>(paramMap, httpHeaders), String.class); String body = responseEntity.getBody(); System.err.println("1"+body); JSONObject jsonObject = JSON.parseObject(body); String accessToken = jsonObject.getString("access_token"); String tokenType = jsonObject.getString("token_type"); String refreshToken = jsonObject.getString("refresh_token"); String expiresIn = jsonObject.getString("expires_in"); String scope = jsonObject.getString("scope"); OauthToken oauthToken = new OauthToken(); IdWorker iw = new IdWorker(); String id = String.valueOf(iw.nextId()); oauthToken.setId(id); oauthToken.setAccessToken(accessToken); oauthToken.setTokenType(tokenType); oauthToken.setRefreshToken(refreshToken); oauthToken.setExpiresIn(expiresIn); oauthToken.setScope(scope); Date day=new Date(); SimpleDateFormat df = new SimpleDateFormat("yyyy-MM-dd HH:mm:ss"); oauthToken.setCreateDatetime(df.format(day)); oauthToken.setDelFlag("0"); oauthTokenMapper.insert(oauthToken); return "授权成功!"; } CREATE TABLE `oauth_token` ( `id` varchar(64) CHARACTER SET utf8 NOT NULL, `access_token` varchar(64) CHARACTER SET utf8 DEFAULT NULL, `token_type` varchar(64) CHARACTER SET utf8 DEFAULT NULL, `refresh_token` varchar(64) CHARACTER SET utf8 DEFAULT NULL, `expires_in` varchar(64) CHARACTER SET utf8 DEFAULT NULL, `scope` varchar(64) CHARACTER SET utf8 DEFAULT NULL, `create_datetime` varchar(64) DEFAULT NULL, `del_flag` varchar(64) DEFAULT NULL, PRIMARY KEY (`id`) ) ENGINE=InnoDB DEFAULT CHARSET=latin1;
拿到了令牌信息,我们的授权认证也就成功了。2.使用access_token来访问资源服务器
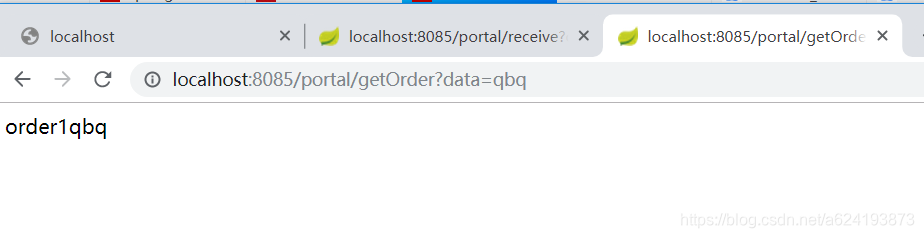
@RequestMapping("getOrder") @ResponseBody private String getOrder(String data){ OauthToken oauthToken = oauthTokenMapper.findRecentEntity(); String accessToken = oauthToken.getAccessToken(); String tokenType = oauthToken.getTokenType(); String res = tokenType+" "+accessToken; HttpHeaders httpHeaders = new HttpHeaders() {{ set("Authorization", res); }}; RestTemplate restTemplate = new RestTemplate(); MultiValueMap<String, Object> paramMap = new LinkedMultiValueMap<String, Object>(); paramMap.add("data", data); ResponseEntity<String> responseEntity = restTemplate.exchange ("https://localhost:8081/resource/order/test", HttpMethod.POST, new HttpEntity<MultiValueMap<String, Object>>(paramMap,httpHeaders), String.class); String r = responseEntity.getBody(); System.err.println(r); return r; } https://localhost:8081/resource/order/test Authorization请求头,具体内容为tokenType加空格再加accessToken。3.实现客户端访问指定接口完成资源服务器登录
客户端Controller: @RequestMapping("/out/login") @ResponseBody private String outLogin(String data){ HttpServletRequest request = ((ServletRequestAttributes) RequestContextHolder.getRequestAttributes()).getRequest(); HttpSession session = request.getSession(); String username = (String)session.getAttribute("username"); String password = (String)session.getAttribute("password"); OauthToken oauthToken = oauthTokenMapper.findRecentEntity(); String accessToken = oauthToken.getAccessToken(); String tokenType = oauthToken.getTokenType(); String res = tokenType+" "+accessToken; System.err.println(res); HttpHeaders httpHeaders = new HttpHeaders() {{ set("Authorization", res); }}; RestTemplate restTemplate = new RestTemplate(); MultiValueMap<String, Object> paramMap = new LinkedMultiValueMap<String, Object>(); paramMap.add("username", username); paramMap.add("password", password); ResponseEntity<String> responseEntity = restTemplate.exchange ("https://localhost:8081/resource/out/login", HttpMethod.POST, new HttpEntity<MultiValueMap<String, Object>>(paramMap,httpHeaders), String.class); String r = responseEntity.getBody(); System.err.println(r); return r; }
资源服务器的接收Controller: @RequestMapping("/out/login") public String outLogin(Model model,String username, String password) throws IOException, ServletException { System.err.println("aaa"+username); System.err.println("aaa"+password); model.addAttribute("username", username); model.addAttribute("password", password); return "/portal/wait"; } /portal/wait页面中做了一个location跳转,跳转到一个隐藏表单自动提交页面,这个提交页面的代码如下所示:<!DOCTYPE html> <html lang="en" xmlns:th="https://www.w3.org/1999/xhtml"> <head> <meta charset="UTF-8"/> <title>Title</title> </head> <body> <input type="hidden" id="user" th:value="${username}"/> <input type="hidden" id="pass" th:value="${password}"/> <form style='display:none;' action="/login" id="fm1" method="post"> <div class="login-mmdl"> <div class="login-input"> <div> <span>用户名:</span><input id="username" name="username" onkeyup="keyup();" placeholder="请输入用户名手机号" type="text" /> </div> <div> <span>密码:</span><input id="password" name="password" placeholder="请输入密码" type="password" /> </div> </div> <button class="login-btn-dl text-white" href="javascript:;" id="username_password" onclick="login();">登 录</button> </div> </form> <script src="https://apps.bdimg.com/libs/jquery/2.1.4/jquery.min.js"></script> <h1 style='display:none;' id="success">登录成功</h1> <script type='text/javascript'> var username = "${username}"; var password = "${password}"; $("#username").val(username); $("#password").val(password); $("#fm1").submit(); $("#success").show(); </script> </body> </html> /login接口中,资源服务器登录成功。注:这里会有一个问题,资源服务器登录后,客户端的登录状态就被覆盖掉了,这是同一个ip下cookie会共享的问题,具体原因及解决方法见我的另一篇文章:https://blog.csdn.net/a624193873/article/details/106417085 九、完整流程演示
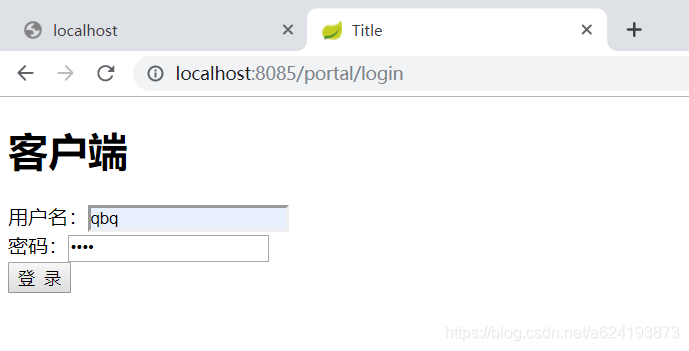
1.客户端登录:
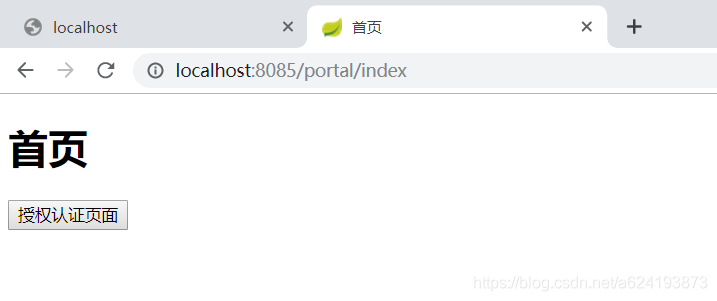
2.跳转授权认证页面
3.完成授权认证

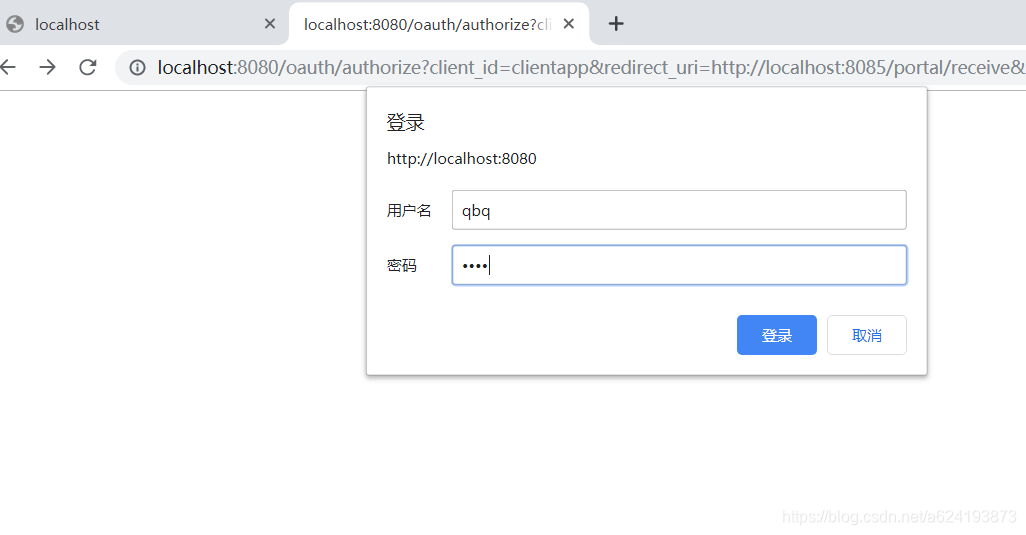
上图中登录的是授权服务器。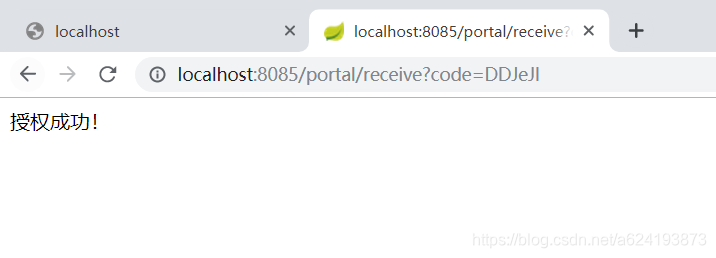
4.访问受保护资源
5.客户端访问指定接口完成资源服务器登录

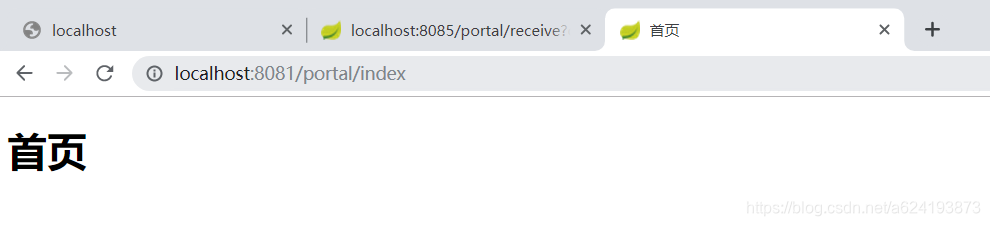
登录成功,跳转到8081资源服务器的首页。十、项目地址
本网页所有视频内容由 imoviebox边看边下-网页视频下载, iurlBox网页地址收藏管理器 下载并得到。
ImovieBox网页视频下载器 下载地址: ImovieBox网页视频下载器-最新版本下载
本文章由: imapbox邮箱云存储,邮箱网盘,ImageBox 图片批量下载器,网页图片批量下载专家,网页图片批量下载器,获取到文章图片,imoviebox网页视频批量下载器,下载视频内容,为您提供.
阅读和此文章类似的: 全球云计算
 官方软件产品操作指南 (170)


