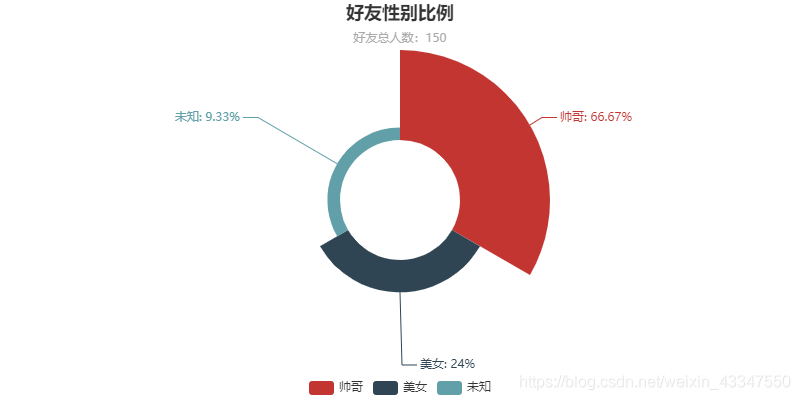
确保安装用到的模块和库: 通过分析我得知我的交际圈被male占领了,怪不得我还没有女朋友呢!不过也不完全对,毕竟我是计算机专业的,男女比例也达到了惊人的8:1,哎,遥遥无期啊,距离脱单。想起个段子,程序猿没有对象,可以 new 一个对象出来,哈哈!!! 代码实现: 我们再通过可视化画出一个Bar图来更加清楚下,虽然结果很好,就是不知道最后那个省份是个什么鬼,都哪里来的,。。。。: 写到这里,我看了下数据,发现有很多人忘了写呀,这可是我需要的东西,你不写多不好。嗯我在也就这里说说。嘿嘿。不过说回来,通过词云分析我大概也分析出个东东来。 先看下效果图,当然了,我打马赛克了,不然认识的人看见,发现是我写的,那我就准备new一个自己来了。开玩笑,哈哈。 写到这本片就完了,我的头发还是那么茂密!
目录
前提准备
itchat pyecharts jieba wordcloud collections PIL 第一步获取朋友圈好友的数据
import itchat # 获取数据 def get_data(): itchat.auto_login() friends = itchat.get_friends(update=True) # 返回一个包含用户信息字典的列表 return friends 第二步处理数据,并存储到txt文件中
# 处理数据 def parse_data(data): friends = [] for item in data[1:]: # 因为第一个元素是自己的信息,去掉 friend = { 'NickName': item['NickName'], # 昵称 'RemarkName': item['RemarkName'], # 备注名 'Sex': item['Sex'], # 性别:1男,2女,0未设置 'Province': item['Province'], # 省份 'City': item['City'], # 城市 'Signature': item['Signature'].replace('n', ' ').replace(',', ' '), # 个性签名(处理签名内容换行的情况) } #print(friend) friends.append(friend) return friends # 存储数据,存储到txt文件 def save_to_txt(): friends = parse_data(get_data()) for item in friends: with open('friends.txt', mode='a', encoding='utf-8') as f: f.write('%s,%s,%d,%s,%s,%sn' % ( item['NickName'], item['RemarkName'], item['Sex'], item['Province'], item['City'], item['Signature'],)) 第三步开始分析,走起!
3.1 分析朋友圈sex

看一下实现代码:from pyecharts import Pie def stastic_sex(): # 获取所有性别 sex = [] with open('friends.txt', mode='r', encoding='utf-8') as f: rows = f.readlines() for row in rows: print(row.split(',')[2]) sex.append(row.split(',')[2]) # 统计每个性别的数量 attr = ['帅哥', '美女', '未知'] value = [sex.count('1'), sex.count('2'), sex.count('0')] pie = Pie('好友性别比例', '好友总人数:%d' % len(sex), title_pos='center') pie.add('', attr, value, radius=[30, 75], rosetype='area', is_label_show=True, is_legend_show=True, legend_top='bottom',is_more_utils=True) # pie.show_config() pie.render('好友性别比例.html') 3.2 分析好友昵称,看看起名都有什么个操作
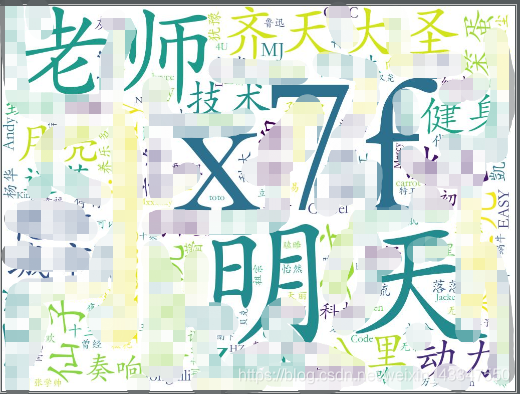
好吧,朋友圈里老师挺多的,这个情有可原,但是这个什么明天是神马,都赶着明天集市吗,哈哈,又看了看其他的,嗯,我好友里面还算干净些,没什么牛逼哄哄的称号哈。想想自己的名字,嗯是不是该赶着潮流了~~~~~~#utf-8 import jieba from wordcloud import WordCloud # 获取全部的名字 NickNames = [] with open('friends.txt', 'r', encoding='utf-8') as f: rows = f.readlines() for row in rows: NickName = row.split(',')[0] if NickName != '': # print(City) NickNames.append(NickName) # 设置分词 False精准模式分词、True全模式分词 split = jieba.cut(str(NickNames), cut_all=False) words = ' '.join(split) # 以空格进行拼接 # print(words) # WordCloud()函数的词云参数分别表示:画布宽高、背景颜色、背景图形状、字体、屏蔽词、最大词的字体大小 wc = WordCloud(width=1024, height=768, background_color='white', font_path='STKAITI.TTF',max_font_size=400, random_state=50) # 将分词后数据传入云图 wc.generate_from_text(words) wc.to_file('好友昵称词云.jpg') 3.3分析哪里来的
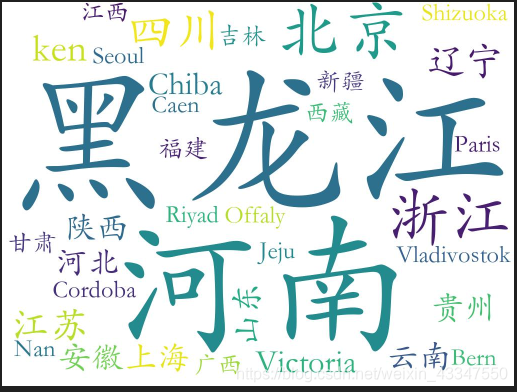
我不看不知道,一看吓一跳。这我以后嗯,可以放心了,劳资是的东北大汉,旁边兄弟那统统都是你愁啥,瞅你咋地,再瞅个试试,试试就试试,的,嗯,不错。不过最后我突然想起个段子,不知道当讲不当讲,反正笑笑是可以的:孩子的爸身体缸缸的,就是没有文化,没给几个孩子起名字,就按大小顺序管孩子叫大鳖犊子、二鳖犊子……。
哈哈哈。
话不多说,进入正题还是,看一下实现代码:import jieba from wordcloud import WordCloud # 获取全部的省份名 Provinces = [] with open('friends.txt', 'r', encoding='utf-8') as f: rows = f.readlines() for row in rows: Province = row.split(',')[3] if Province != '': # print(City) Provinces.append(Province) # 设置分词 False精准模式分词、True全模式分词 split = jieba.cut(str(Provinces), cut_all=False) words = ' '.join(split) # 以空格进行拼接 # print(words) # WordCloud()函数的词云参数分别表示:画布宽高、背景颜色、背景图形状、字体、屏蔽词、最大词的字体大小 wc = WordCloud(width=1024, height=768, background_color='white', font_path='STKAITI.TTF',max_font_size=400, random_state=50) # 将分词后数据传入云图 wc.generate_from_text(words) wc.to_file('好友省份词云.jpg')
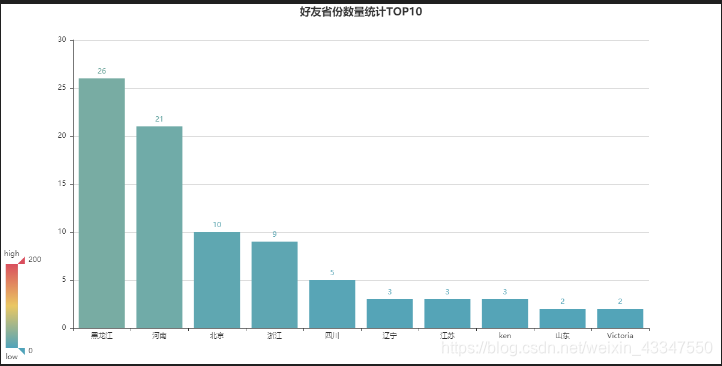
代码如下:# utf-8 import jieba # 导入Counter类,用于统计值出现的次数 from collections import Counter from pyecharts import Bar Provinces = [] with open('friends.txt', mode='r', encoding='utf-8') as f: rows = f.readlines() for row in rows: Province = row.split(',')[3] if Province != '': Provinces.append(Province) words = [] for cutword in jieba.cut(str(Provinces), cut_all=False): if cutword not in ['_', '-', ',', '(', ')', '(', ')', ' ', "'"]:# 排除下划线、短横线、逗号、空格、单引号 防止出错 words.append(cutword) data_top10 = Counter(words).most_common(10) # 返回出现次数最多的前10条 # print(data_top10) bar = Bar('好友省份数量统计TOP10', '', title_pos='center', width=1200, height=600) attr, value = bar.cast(data_top10) bar.add('', attr, value, visual_range=[0, 200], is_visualmap=True, is_label_show=True) bar.render('好友省份数量统计TOP10.html') 3.4分析朋友圈的个性签名
看来部分朋友,class没学好好啊,都搁这写呢!哈哈

代码实现:#utf-8 import jieba from wordcloud import WordCloud # 获取全部的个性签名 Signatures = [] with open('friends.txt', 'r', encoding='utf-8') as f: rows = f.readlines() for row in rows: Signature = row.split(',')[5] if Signature != '': # print(City) Signatures.append(Signature) # 设置分词 False精准模式分词、True全模式分词 split = jieba.cut(str(Signatures), cut_all=False) words = ' '.join(split) # 以空格进行拼接 # print(words) # WordCloud()函数的词云参数分别表示:画布宽高、背景颜色、背景图形状、字体、屏蔽词、最大词的字体大小 wc = WordCloud(width=1024, height=768, background_color='white', font_path='STKAITI.TTF',max_font_size=400, random_state=50) # 将分词后数据传入云图 wc.generate_from_text(words) wc.to_file('好友个性签名词云.jpg') 最后了,重磅来袭,输出所有朋友圈的头像合成在一张图片上
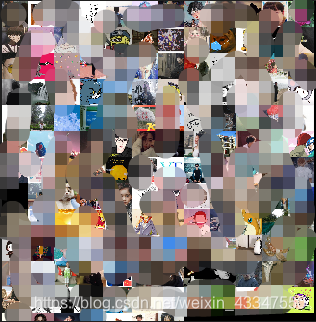
具体实现完整代码如下:import itchat import os import math from PIL import Image # 获取数据 def download_image(): # 扫描二维码登陆微信,即通过网页版微信登陆 itchat.auto_login() # 返回一个包含用户信息字典的列表 friends = itchat.get_friends(update=True) # 在当前位置创建一个用于存储头像的目录wechatImages base_path = 'wechatImages' if not os.path.exists(base_path): os.mkdir(base_path) # 获取所有好友头像 for friend in friends: # 获取头像数据 img_data = itchat.get_head_img(userName = friend['UserName']) #判断备注名是否为空 if friend['RemarkName'] != '': img_name = friend['RemarkName'] else : img_name = friend['NickName'] # 在实际操作中如果文件名中含有*标志,会报错。则直接可以将其替换掉 if img_name is "*": img_name = "" #通过os.path.join()函数来拼接文件名 img_file = os.path.join(base_path, img_name + '.jpg') print(img_file) with open(img_file, 'wb') as file: file.write(img_data) # 拼接头像 def join_image(): base_path = 'wechatImages' files = os.listdir(base_path) #返回指定的文件或文件夹的名字列表 print(len(files)) each_size = int(math.sqrt(float(6400 * 6400) / len(files)))#计算每个粘贴图片的边长 lines = int(6400 / each_size)#计算总共有多少行 print(lines) image = Image.new('RGB', (6400, 6400))# new(mode, size, color=0) 定义一张大小为640*640大小的图片,不给出第三个参数默认为黑色 x = 0 #定义横坐标 y = 0 #定义纵坐标 for file_name in files: img = Image.open(os.path.join(base_path, file_name)) #找到/打开图片 img = img.resize((each_size, each_size), Image.ANTIALIAS)#实现图片同比例缩放,Image.ANTIALIAS添加滤镜效果 image.paste(img, (x * each_size, y * each_size))#将缩放后的照片放到对应的坐标下 x += 1 if x == lines:#如果每行的粘贴内容够了,则换行 x = 0 y += 1 image.save('jointPic.jpg')#最后将全部的照片保存下来 if __name__ == '__main__': # download_image() join_image()

本网页所有视频内容由 imoviebox边看边下-网页视频下载, iurlBox网页地址收藏管理器 下载并得到。
ImovieBox网页视频下载器 下载地址: ImovieBox网页视频下载器-最新版本下载
本文章由: imapbox邮箱云存储,邮箱网盘,ImageBox 图片批量下载器,网页图片批量下载专家,网页图片批量下载器,获取到文章图片,imoviebox网页视频批量下载器,下载视频内容,为您提供.
阅读和此文章类似的: 全球云计算
 官方软件产品操作指南 (170)


