setContentView 方法如下所示,调用的是 window 中的 setContentView,但是 window 中的只是一个抽象方法: 而在 window 类的最开始也说了,window 唯一的实现类是 PhoneWindow。所以这里调用的是 PhoneWindow 中的 setContentView,如下: 在 setContentView 方法中,调用了 installDecor(),下面分析一下这个方法。 首先会创建一个 DecorView ,这是一个 继承子 Fragment 的View 。也就是说 Window 类中包含了一个 DecorView。 接着就会判断 mContentParent 是否为 null,如果为 null,就会调用 generateLayout 去创建,mContentParent 是一个 ViewGroup。在 generateLayout中会调用系统的资源,判断系统当前的窗口模式。然后加载对应的布局。最终就会将这个资源文件加载到 DecorView 中。并且会调用 findViewById 找到一个 ViewGroup,并返回,点开findViewById ,就可以看到里面用的 View 是 DecorView 。至于加载的是那个 id,如下所示: 一般情况下,加载的资源layout中都有会 framelayout 这个 View,并且可以看到 id 为 @android:id/content。你可以复制布局名称然后全局搜索查看一下这个布局。 布局如下: 到这里,installDecor()方法中比较重要的地方已经看完了。梳理一下: 在 setContentView() 中创建 DecorView ,接着根据系统窗口的类型获取到一个资源 layout。接着讲这个资源文件 加载到 DecorView 中,并 通过findViewById 获取了 资源文件中 id 为 @android:id/content 的控件,将其强转为 ViewGroup 并返回。 在 setContentView 方法中,调用完 installDecor()方法后,往下还有非常重要的一句话 这个 layoutResID 就是 调用 setContentView 时传入的。这里将这个资源加载到了 mContentParent 上面,通过上面的分析我们可以知道 contentParent 就是 DecorView 中 id 为 @android:id/content 的 Framelayout 布局。 我们可以做一个测试,看一下我们分析的有没有问题: 这是一个 activity 的 onCreate 方法,我注释掉了 setContentView 方法,并直接加载了一个布局。然后调用 window 中的 decorView。获取到其中的 frameLayout,然后将 布局添加进去。 最终运行显示的效果是正常的。 下面给一张图,清楚的展示了布局加载的流程 其实相比于 Activity 的 setContentView 还是有一些区别。主要是为了兼容低版本的一些东西。 接下来就看一下源码吧 这里调用的 setContentView 也是一个抽象方法,最终调用的是 AppCompatDelegateImpl 中的 看流程,可以发现最终还是调用的 window 中的 setContentView,但是在这里有多了一层 他首先会创建一个ViewGroup,然后根据一系列的判断添加一个layout。最后调用 window 的 setContentView 。接着就会将我们传入的布局 添加到这个 ViewGroup 中,相比于 Activity。他中间多了一个 ViewGroup。 一个小例子:新建一个 activity,在布局中创建一个 ImageView。 接着让 activity 首先继承 Activity ,最后继承 AppCompatActivity,然后打印 ImageView 发现如果是继承自 AppcompatActivity,则 iamgeView 最终创建的是 AppCompatImageView ,具有兼容性的 ImageView。这个是为啥呢,下面分析一下源码: 源码分析: 首先在 AppCompatActivity 的 onCreate 方法中 调用了一个非常重要的方法,如下: AppCompatDelegateImpl 实现了一个接口 LayoutInflater.Factory2 LayoutInflater.from(mContext) 其实是一个单例。他会将 LayoutInflater 的 Factory 设置为 this。 当我们在使用这种 : LayoutInflater.from(this).inflate(layout(), parent) 代码时,就会调用到 AppCompatDelegateImpl 类中 实现 LayoutInflater.Factory2的 onCreateView 方法, 通过上面可以看到 在使用 LayoutInflater.from(this).inflate(layout(), null) 时,是如何调用到 AppCompatDelegateImpl 中的 onCreateView 中的。 接着看一下 onCreateView 最终将替换后的 View 进行返回 这里比较重要的是 View 的创建首先会走 mFactory2,然后才会走 mFactory,只要不会 null,就会执行 Factory 的 onCreateView 方法。否则最后就会走 系统的 createView 方法。 主要用来实例化我我们的 layout 布局 使用的方式 从源码中可以看到,第一种调用的是第二种,第二种调用的是第三种,根据有没有传入根布局来传入第三个参数。所以我们只需要看第三个方法就 ok 看一下 LayoutInflater.from() 可以看到这里拿到的是一个系统的服务 接着往下看就可以看到这个服务是从一个 静态的 Map 中获取的。那么这个 Map 是怎么初始化的呢? ContextImpl 中有一个静态代码块,专门用来注册各种服务,LAYOUT_INFLATER_SERVICE 也是其中的一个。 由此我们可以得知 LayoutInflater.from(this) 是一个系统服务,并且他是一个单例。 接着看一下是怎样实例化 View 的 在 AppCompatDelegateImp 中 为什么能走自己的 onCreateView 方法,就是因为他设置了 mFactory ,所以才可以拦截 View 的创建 如果说 mFactory 都等于 空,最后会自己创建 view,如果不为空,则 View 的创建会被拦截,去执行对应 mFactory 中的方法 接着我们看下没有使用 mFactory 的 View 创建 大致看完了源码,需要知道一些几个问题 1,如果获取 LayoutInflater 通过获取系统的服务,并且是一个单例 2,如果使用 LayoutInflater 三种使用方式,在开头说过了 3,布局是如果被实例化的 最终布局是通过反射进行实例化的 4,mFactory 的作用 拦截 View 的创建,使 View 的创建走自定义的流程,如 AppCompatView 的 setContentView 中。 5,xml 和 直接 new 出来的有啥区别 布局文件中的VIew 创建调用的是两个参数的构造,而直接 new 的是通过一个参数的构造。并且 xml 中定义的布局最终是通过反射进行创建的,所以尽量不要多重嵌套 按照上面的分析可以知道,如果要拦截 View 的创建,就需要给 LayoutInflater 设置 Factory 。 上面给 LayoutInflater 设置了一个 Factory,拦截了 VIew 的创建 在 onCreateView 中,判断如果是 Button,就修改他显示的内容。 最终的结果就是拦截成功了。 到这里整片文章就弄完了,如果有问题还请指出!,对你有帮助的还请点个赞!谢谢 参考自 红橙Darren 的视频
文章目录
Activity 中的 setContentView
public void setContentView(@LayoutRes int layoutResID) { getWindow().setContentView(layoutResID); initWindowDecorActionBar(); } public abstract void setContentView(View view, ViewGroup.LayoutParams params); @Override public void setContentView(int layoutResID) { //父容器如果为 null 则进行创建 if (mContentParent == null) { installDecor(); } else if (!hasFeature(FEATURE_CONTENT_TRANSITIONS)) { mContentParent.removeAllViews(); } if (hasFeature(FEATURE_CONTENT_TRANSITIONS)) { final Scene newScene = Scene.getSceneForLayout(mContentParent, layoutResID, getContext()); transitionTo(newScene); } else { //将传入的资源Id 加载到 mContentParent 上 mLayoutInflater.inflate(layoutResID, mContentParent); } mContentParent.requestApplyInsets(); final Callback cb = getCallback(); if (cb != null && !isDestroyed()) { cb.onContentChanged(); } mContentParentExplicitlySet = true; } private void installDecor() { mForceDecorInstall = false; if (mDecor == null) { // return new DecorView(context, featureId, this, getAttributes()); //最终会创建一个 DecorView 赋值给 mDecor mDecor = generateDecor(-1); //..... } else { mDecor.setWindow(this); } //mContentParent是一个 VeiwGroup if (mContentParent == null) { //最终会根据当前窗口样式加载一个资源文件,并且加载到 mDecor 中, //并返回资源文件中 id 为: @android:id/content 的ViewGroup,类型为 FrameLayout mContentParent = generateLayout(mDecor); } } protected ViewGroup generateLayout(DecorView decor) { // 获取自当前主题的数据 TypedArray a = getWindowStyle(); //....... // 装饰 decor,判断当前窗口的属性,将符合条件的布局添加到 decor int layoutResource; int features = getLocalFeatures(); else if ((features & ((1 << FEATURE_PROGRESS) | (1 << FEATURE_INDETERMINATE_PROGRESS))) != 0 && (features & (1 << FEATURE_ACTION_BAR)) == 0) { layoutResource = R.layout.screen_progress; } else if ((features & (1 << FEATURE_CUSTOM_TITLE)) != 0) { //加载资源 layoutResource = R.layout.screen_custom_title; } else if ((features & (1 << FEATURE_NO_TITLE)) == 0) { layoutResource = res.resourceId; layoutResource = R.layout.screen_title; } else if ((features & (1 << FEATURE_ACTION_MODE_OVERLAY)) != 0) { layoutResource = R.layout.screen_simple_overlay_action_mode; } else { layoutResource = R.layout.screen_simple; } mDecor.startChanging(); //调用 mDecor 的方法,将刚才找到的系统布局文件加载到 DecorView 中 mDecor.onResourcesLoaded(mLayoutInflater, layoutResource); // ID_ANDROID_CONTENT 这个ID 就是资源文件中的 Id //点开findViewById ,就可以看到里面用的 View 是 DecorView ViewGroup contentParent = (ViewGroup)findViewById(ID_ANDROID_CONTENT); if (contentParent == null) { throw new RuntimeException("Window couldn't find content container view"); } //...... mDecor.finishChanging(); return contentParent; } <LinearLayout xmlns:android="https://schemas.android.com/apk/res/android" android:layout_width="match_parent" android:layout_height="match_parent" android:fitsSystemWindows="true" android:orientation="vertical"> <ViewStub android:id="@+id/action_mode_bar_stub" android:inflatedId="@+id/action_mode_bar" android:layout="@layout/action_mode_bar" android:layout_width="match_parent" android:layout_height="wrap_content" android:theme="?attr/actionBarTheme" /> <FrameLayout android:id="@android:id/content" android:layout_width="match_parent" android:layout_height="match_parent" android:foregroundInsidePadding="false" android:foregroundGravity="fill_horizontal|top" android:foreground="?android:attr/windowContentOverlay" /> </LinearLayout> 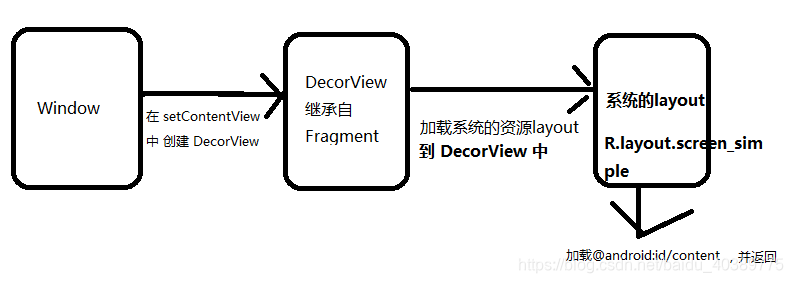
mLayoutInflater.inflate(layoutResID, mContentParent); 
最终大致的逻辑如上图override fun onCreate(savedInstanceState: Bundle?) { super.onCreate(savedInstanceState) // setContentView(layout()) val view = LayoutInflater.from(this).inflate(layout(), null) val decorView = window.decorView val frameLayout = decorView.findViewById<FrameLayout>(android.R.id.content) frameLayout.addView(view) } 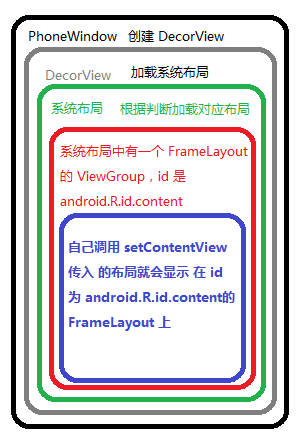
AppCompatActivity 中的 setContentView
@Override public void setContentView(View view, ViewGroup.LayoutParams params) { getDelegate().setContentView(view, params); } @NonNull public AppCompatDelegate getDelegate() { if (mDelegate == null) { mDelegate = AppCompatDelegate.create(this, this); } return mDelegate; } public static AppCompatDelegate create(Activity activity, AppCompatCallback callback) { return new AppCompatDelegateImpl(activity, activity.getWindow(), callback); } @Override public void setContentView(View v) { ensureSubDecor(); ViewGroup contentParent = (ViewGroup) mSubDecor.findViewById(android.R.id.content); contentParent.removeAllViews(); contentParent.addView(v); mOriginalWindowCallback.onContentChanged(); } private void ensureSubDecor() { if (!mSubDecorInstalled) { mSubDecor = createSubDecor(); } } private ViewGroup createSubDecor() { TypedArray a = mContext.obtainStyledAttributes(R.styleable.AppCompatTheme); final LayoutInflater inflater = LayoutInflater.from(mContext); //空的 ViewGroup ViewGroup subDecor = null; //根据一系列的判断,最后加载一个 layout 到 ViewGroup 上 if (!mWindowNoTitle) { subDecor = (ViewGroup) inflater.inflate( R.layout.abc_dialog_title_material, null); } else if (mHasActionBar) { subDecor = (ViewGroup) LayoutInflater.from(themedContext) .inflate(R.layout.abc_screen_toolbar, null); } else { if (mOverlayActionMode) { subDecor = (ViewGroup) inflater.inflate( R.layout.abc_screen_simple_overlay_action_mode, null); } else { subDecor = (ViewGroup) inflater.inflate(R.layout.abc_screen_simple, null); } } //获取 subDecor 中的id final ContentFrameLayout contentView = (ContentFrameLayout) subDecor.findViewById( R.id.action_bar_activity_content); //这里获取的是 Window 中的 DecorView final ViewGroup windowContentView = (ViewGroup) mWindow.findViewById(android.R.id.content); if (windowContentView != null) { //设置一个 空的 Id windowContentView.setId(View.NO_ID); //给 contentView 设置一个新的 id contentView.setId(android.R.id.content); } //最终还是调用了 window 中的 setContentView 方法 // Now set the Window's content view with the decor mWindow.setContentView(subDecor); return subDecor; } AppCompatActivity 的兼容性
<ImageView android:id="@+id/test_iv" android:layout_width="match_parent" android:layout_height="200dp" android:layout_marginTop="50dp" android:src="@drawable/image"/> android.widget.ImageView androidx.appcompat.widget.AppCompatImageView
@Override protected void onCreate(@Nullable Bundle savedInstanceState) { final AppCompatDelegate delegate = getDelegate(); //安装View 的工厂,这里的 delegate 就是 AppCompatDelegateImpl delegate.installViewFactory(); delegate.onCreate(savedInstanceState); super.onCreate(savedInstanceState); } @Override public void installViewFactory() { LayoutInflater layoutInflater = LayoutInflater.from(mContext); if (layoutInflater.getFactory() == null) { //把 LayoutInflater 的 Factory 设置为 this,也就是说创建 View 就会掉自己的 onCreateView 方法 //如果没看懂就看一下 LayoutInflater 的源码,LayoutInflater.from(mContext) 其实是一个单例 //如果设置了 Factory,那么每次创建 View 时都会先执行 onCreateView 方法 LayoutInflaterCompat.setFactory2(layoutInflater, this); } else { if (!(layoutInflater.getFactory2() instanceof AppCompatDelegateImpl)) { Log.i(TAG, "The Activity's LayoutInflater already has a Factory installed" + " so we can not install AppCompat's"); } } } public abstract class LayoutInflater { @UnsupportedAppUsage(trackingBug = 122360734) @Nullable public final View tryCreateView(@Nullable View parent, @NonNull String name, @NonNull Context context, @NonNull AttributeSet attrs) { if (name.equals(TAG_1995)) { // Let's party like it's 1995! } View view; if (mFactory2 != null) { //这里,LayoutInflater.from(this).inflate(layout(), null),如果使用 AppCompatActivity ,就会给 mFactory2 设置一个值,最终这里就会调用到 AppCompatDelegateImpl 中的 onCreateView 中。 view = mFactory2.onCreateView(parent, name, context, attrs); } else if (mFactory != null) { view = mFactory.onCreateView(name, context, attrs); } else { view = null; } if (view == null && mPrivateFactory != null) { view = mPrivateFactory.onCreateView(parent, name, context, attrs); } return view; } } /** * From {@link LayoutInflater.Factory2}. */ @Override public final View onCreateView(View parent, String name, Context context, AttributeSet attrs) { return createView(parent, name, context, attrs); } @Override public View createView(View parent, final String name, @NonNull Context context, @NonNull AttributeSet attrs) { //....... return mAppCompatViewInflater.createView(parent, name, context, attrs, inheritContext, IS_PRE_LOLLIPOP, true, VectorEnabledTintResources.shouldBeUsed() ); } final View createView(View parent, final String name, @NonNull Context context, @NonNull AttributeSet attrs, boolean inheritContext, boolean readAndroidTheme, boolean readAppTheme, boolean wrapContext) { final Context originalContext = context; //....... View view = null; //在这里进行了替换 switch (name) { case "TextView": view = createTextView(context, attrs); verifyNotNull(view, name); break; case "ImageView": view = createImageView(context, attrs); verifyNotNull(view, name); break; case "Button": view = createButton(context, attrs); verifyNotNull(view, name); break; case "EditText": view = createEditText(context, attrs); verifyNotNull(view, name); break; case "Spinner": view = createSpinner(context, attrs); verifyNotNull(view, name); break; case "ImageButton": view = createImageButton(context, attrs); verifyNotNull(view, name); break; case "CheckBox": view = createCheckBox(context, attrs); verifyNotNull(view, name); break; case "RadioButton": view = createRadioButton(context, attrs); verifyNotNull(view, name); break; case "CheckedTextView": view = createCheckedTextView(context, attrs); verifyNotNull(view, name); break; case "AutoCompleteTextView": view = createAutoCompleteTextView(context, attrs); verifyNotNull(view, name); break; case "MultiAutoCompleteTextView": view = createMultiAutoCompleteTextView(context, attrs); verifyNotNull(view, name); break; case "RatingBar": view = createRatingBar(context, attrs); verifyNotNull(view, name); break; case "SeekBar": view = createSeekBar(context, attrs); verifyNotNull(view, name); break; default: // The fallback that allows extending class to take over view inflation // for other tags. Note that we don't check that the result is not-null. // That allows the custom inflater path to fall back on the default one // later in this method. view = createView(context, name, attrs); } return view; } //替换后的 AppComptImageView @NonNull protected AppCompatImageView createImageView(Context context, AttributeSet attrs) { return new AppCompatImageView(context, attrs); }
LayoutInflater
View.inflate(this,R.layout.activity_main,null) //1 LayoutInflater.from(this).inflate(R.layout.activity_main,null) //2 LayoutInflater.from(this).inflate(R.layout.activity_main,null,false) //3 //1 public static View inflate(Context context, @LayoutRes int resource, ViewGroup root) { LayoutInflater factory = LayoutInflater.from(context); return factory.inflate(resource, root); } //2 public View inflate(@LayoutRes int resource, @Nullable ViewGroup root) { return inflate(resource, root, root != null); } //3 public View inflate(@LayoutRes int resource, @Nullable ViewGroup root, boolean attachToRoot) { //...... } public static LayoutInflater from(Context context) { LayoutInflater LayoutInflater = (LayoutInflater) context.getSystemService(Context.LAYOUT_INFLATER_SERVICE); return LayoutInflater; } ############################# ContextImpl ############ @Override public Object getSystemService(String name) { return SystemServiceRegistry.getSystemService(this, name); } //一个静态的 Map private static final Map<String, ServiceFetcher<?>> SYSTEM_SERVICE_FETCHERS = new ArrayMap<String, ServiceFetcher<?>>(); public static Object getSystemService(ContextImpl ctx, String name) { ServiceFetcher<?> fetcher = SYSTEM_SERVICE_FETCHERS.get(name); return fetcher != null ? fetcher.getService(ctx) : null; } public View inflate(@LayoutRes int resource, @Nullable ViewGroup root, boolean attachToRoot) { //获取资源文件 final Resources res = getContext().getResources(); //XmlResourceParser 的解析器 XmlResourceParser parser = res.getLayout(resource); try { return inflate(parser, root, attachToRoot); } finally { parser.close(); } } public View inflate(XmlPullParser parser, @Nullable ViewGroup root, boolean attachToRoot) { synchronized (mConstructorArgs) { Trace.traceBegin(Trace.TRACE_TAG_VIEW, "inflate"); //........... //保存传进来的 Viwe View result = root; try { advanceToRootNode(parser); final String name = parser.getName(); //如果是 merge 标签 就调用 rInflate,否则执行 else if (TAG_MERGE.equals(name)) { if (root == null || !attachToRoot) { throw new InflateException("<merge /> can be used only with a valid " + "ViewGroup root and attachToRoot=true"); } //这里直接加载界面,忽略 marge 标记,直接传入 root 进 rInflate 进行加载子 View rInflate(parser, root, inflaterContext, attrs, false); } else { // Temp是在xml中找到的根视图,创建 View final View temp = createViewFromTag(root, name, inflaterContext, attrs); ViewGroup.LayoutParams params = null; // root 如果不为空,则设置 layoutParams if (root != null) { if (DEBUG) { System.out.println("Creating params from root: " + root); } // Create layout params that match root, if supplied params = root.generateLayoutParams(attrs); if (!attachToRoot) { // Set the layout params for temp if we are not // attaching. (If we are, we use addView, below) temp.setLayoutParams(params); } } //先获取到了temp,再把temp当做root传进去rInflateChildren,进行加载temp后面的子view rInflateChildren(parser, temp, attrs, true); //把 View 添加到 root 布局并设置布局参数 if (root != null && attachToRoot) { root.addView(temp, params); } //... } } catch (XmlPullParserException e) { //... } return result; } } //创建 View View createViewFromTag(View parent, String name, Context context, AttributeSet attrs, boolean ignoreThemeAttr) { //...... try { //创建 View View view = tryCreateView(parent, name, context, attrs); //如果没有创建成果 if (view == null) { final Object lastContext = mConstructorArgs[0]; mConstructorArgs[0] = context; try { //判断 name 是否为 全类名,最终创建反射创建 View //如果不是全类别,就需要进行拼接 if (-1 == name.indexOf('.')) { view = onCreateView(context, parent, name, attrs); } else { view = createView(context, name, null, attrs); } } finally { mConstructorArgs[0] = lastContext; } } return view; } catch (InflateException e) { //.... } } public final View tryCreateView(@Nullable View parent, @NonNull String name, @NonNull Context context, @NonNull AttributeSet attrs) { View view; //mFactory2 如果不为 空,则直接调用 mFactory2 的 onCreateView // AppCompatActivity 中就设置了 mFactory2 if (mFactory2 != null) { view = mFactory2.onCreateView(parent, name, context, attrs); } else if (mFactory != null) { view = mFactory.onCreateView(name, context, attrs); } else { view = null; } if (view == null && mPrivateFactory != null) { view = mPrivateFactory.onCreateView(parent, name, context, attrs); } return view; } //默认的 View 创建流程 public View onCreateView(@NonNull Context viewContext, @Nullable View parent, @NonNull String name, @Nullable AttributeSet attrs) throws ClassNotFoundException { return onCreateView(parent, name, attrs); } protected View onCreateView(String name, AttributeSet attrs) throws ClassNotFoundException { //添加全类名 return createView(name, "android.view.", attrs); } public final View createView(@NonNull Context viewContext, @NonNull String name, @Nullable String prefix, @Nullable AttributeSet attrs) throws ClassNotFoundException, InflateException { //从缓存中获取 Constructor<? extends View> constructor = sConstructorMap.get(name); if (constructor != null && !verifyClassLoader(constructor)) { constructor = null; sConstructorMap.remove(name); } Class<? extends View> clazz = null; try { Trace.traceBegin(Trace.TRACE_TAG_VIEW, name); //如果缓存总没有,则反射进行创建,并加入缓存 if (constructor == null) { // Class not found in the cache, see if it's real, and try to add it clazz = Class.forName(prefix != null ? (prefix + name) : name, false, mContext.getClassLoader()).asSubclass(View.class); //拿到构造函数mConstructorSignature = new Class[] {Context.class, AttributeSet.class}; //拿到为两个参数的构造函数 constructor = clazz.getConstructor(mConstructorSignature); constructor.setAccessible(true); sConstructorMap.put(name, constructor); } else { //....... } Object lastContext = mConstructorArgs[0]; mConstructorArgs[0] = viewContext; Object[] args = mConstructorArgs; args[1] = attrs; try { //反射创建 View final View view = constructor.newInstance(args); if (view instanceof ViewStub) { // Use the same context when inflating ViewStub later. final ViewStub viewStub = (ViewStub) view; viewStub.setLayoutInflater(cloneInContext((Context) args[0])); } return view; } finally { mConstructorArgs[0] = lastContext; } }catch (Exception e) { //...... } finally { Trace.traceEnd(Trace.TRACE_TAG_VIEW); } } 拦截 View 的创建
override fun onCreate(savedInstanceState: Bundle?) { intercept() super.onCreate(savedInstanceState) } private fun intercept() { val layoutInflater = LayoutInflater.from(this) LayoutInflaterCompat.setFactory2(layoutInflater, object : LayoutInflater.Factory2 { override fun onCreateView(name: String, context: Context, attrs: AttributeSet): View? { return onCreateView(null, name, context, attrs) } override fun onCreateView( parent: View?, name: String, context: Context, attrs: AttributeSet ): View? { Log.e("BaseSkinActivity", "拦截到 View 的创建") //拦截 View 的创建 return if (name == "Button") { val button = Button(this@BaseSkinActivity) button.id = R.id.test_btn button.text = "拦截" return button } else null } }) }
本网页所有视频内容由 imoviebox边看边下-网页视频下载, iurlBox网页地址收藏管理器 下载并得到。
ImovieBox网页视频下载器 下载地址: ImovieBox网页视频下载器-最新版本下载
本文章由: imapbox邮箱云存储,邮箱网盘,ImageBox 图片批量下载器,网页图片批量下载专家,网页图片批量下载器,获取到文章图片,imoviebox网页视频批量下载器,下载视频内容,为您提供.
阅读和此文章类似的: 全球云计算
 官方软件产品操作指南 (170)


