喜欢不要忘了点个赞哟demo源码 Vue是一套用于构建用户界面的渐进式框架 Vue的核心库只关注视图层,不仅容易上手,还便于与第三方既有项目整合 防止页面加载时出现闪烁问题 这个指令保持在元素上直到关联实例结束编译。和CSS规则如[v-cloak]{display:none}一起用时,编译结束前标签一直有v-cloak属性。 更新元素的 更新元素的 根据表达式之真假值,切换元素的 当条件变化时该指令触发过渡效果。 不同的是带有 跳过这个元素和它的子元素的编译过程。可以用来显示原始 Mustache 标签。跳过大量没有指令的节点会加快编译。 只渲染元素和组件一次。随后的重新渲染,元素/组件及其所有的子节点将被视为静态内容并跳过。这可以用于优化更新性能。 demo 如果事件直接绑定函数名称,那么默认会传递事件对象作为事件函数的第一个参数 如果事件绑定函数调用,那么事件对象必须作为最后一个参数显示传递,并且事件对象的名称必须是$event demo .stop阻止冒泡(阻止父级dom节点的事件被触发) .prevent阻止默认行为(a不会触发跳转) demo 在监听键盘事件时,我们经常需要检查详细的按键。Vue 允许为 .enter回车键 .delete删除键与backspace键 demo demo打印按键对应按键码 全局 config.keyCodes 对象(f1指向112号键,112号键命名f1) demo v-bind指令语法 缩写形式 demo v-bind实现双向数据绑定 对象语法(isActive是一个Boolean数据,判定编译后修饰的class名称是否存在) 数组语法(数组中为data数据,可以赋值为相应的类名) demo 对象语法与数组语法结合使用 当类较多时,可以在data中创建一个数组,绑定到class,然后用数组相关方法操作其中的class 对象绑定同样可以在data中创建一个对象,绑定到class 如果你本来就有一个class,与绑定class同时存在时,不会覆盖会编译到一起 对象语法 数组语法 demo 多个元素 通过条件判断展示或者隐藏某个元素 较简单看demo v-show 和 v-if的区别 v-show本质就是标签display设置为none,控制隐藏(性能较高) v-if是动态的向DOM树内添加或者删除DOM元素 v-for遍历数组 key 的作用:仅使得vue提高性能,无其他变化 demo v-for遍历对象 v-if和v-for结合使用 demo input单行文本(绑定一个数据即可) radio单选框(绑定同一个数据) checkbox多选框(绑定统一个数据(数组形式)) textarea多行文本(绑定一个数据即可) select下拉框(select绑定一个数据即可,下拉多选select添加multiple=“true”,绑定一个数组数据) demo .number :使得输入的数据转化为数值 demo .trim:去掉开始和结尾的空格 demo .lazy:将input事件切换为chenge事件(绑定的数据不会随时变化,会等到你的鼠标焦点离开输入框同步数据) demo 内置指令不满足需求 如果指令名称为驼峰形式fousA,使用是需写为v-focus-a el:指令所绑定的元素 带参数形式 inserted:钩子函数 el、binding:钩子函数参数 demo (在组件中可以接受一个 模板中放入太多的逻辑会让模板过重且难以维护 使用计算属性可以让模板更加的简洁 用法(vue实例中添加一个computed) demo 计算属性与方法的区别 计算属性是基于他们的依赖进行缓存的 方法不存在缓存 如果data中依赖的数据未发生改变,访问两次计算属性是直接访问缓存数据的 侦听器的应用场景 数据变化时执行异步或开销较大的操作 格式化数据,比如将字符串格式化为首字母大写,将日期格式化为指定的格式等 自定义过滤器 过滤器的使用 局部过滤器 demo 带参数的过滤器 过滤器的使用 demo 挂载(初始化相关属性) 创建实例 beforeCreate:在实例初始化之后,数据观测和事件配置之前被调用。 created:在实例创建完成后被立即调用。 beforeMount:在挂载开始之前被调用。 mounted:el 被新创建的 vm .$el 替换,并挂载到实例上去之后调用该钩子。(该函数被触发,初始化模板完成,可以渲染后台调用的数据) 更新(元素或组件的变更操作) 数据发生变化 beforeUpdate:数据更新时调用,发生在虚拟 DOM 打补丁之前。 updated:由于数据更改导致的虚拟 DOM 重新渲染和打补丁,在这之后会调用该钩子。 销毁(销毁相关属性) 销毁实例this.$destroy beforeDestroy:实例销毁之前调用。 destroyed:实例销毁后调用。 END
Vue基础语法
一、HelloWord
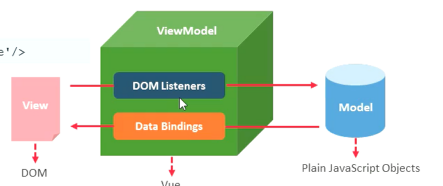
<script src="vue.js"></script> <div id="app"> {{hello}} </div> <script> var vue = new Vue({ el:"#app", data:{ hello:"Hello Vue" } }) </script> 二、MVVM设计思想
三、指令
1. v-cloak
<style> [v-cloak]{ display: none; } </style> <div id="app"> <div v-cloak> {{hello}} </div> </div> <script> var vue = new Vue({ el:"#app", data:{ hello:"Hello Vue" } }) </script> 2. v-text
textContent(标签内文字)。如果要更新部分的 textContent ,需要使用 {{ Mustache }}(插值表达式) 插值。<div id="app"> <div v-text="hello"> </div> </div> <script> var vue = new Vue({ el:"#app", data:{ hello:"Hello Vue" } }) </script> 3. v-html
innerHTML (html标签会被编译)。注意:内容按普通 HTML 插入 – 不会作为 Vue 模板进行编译 。如果试图使用 v-html 组合模板,可以重新考虑是否通过使用组件来替代。<div id="app"> <div v-html="hello"> </div> </div> <script> var vue = new Vue({ el:"#app", data:{ hello:"<h1>Hello Vue</h1>" } }) </script> 4. v-show
display CSS 属性。v-show 的元素始终会被渲染并保留在 DOM 中。v-show 只是简单地切换元素的 CSS 属性 display。<div id="app"> <div v-show="ok" v-html="hello"></div> <div v-show="no" v-html="hello"></div> </div> <script> var vue = new Vue({ el:"#app", data:{ ok:true, no:false, hello:"<h1>Hello Vue</h1>" } }) </script> 4. v-pre
<div id="app"> <!-- 显示的是{{ hello }}跳过编译过程 --> <span v-pre>{{ hello }}</span> </div> <script> var vue = new Vue({ el:"#app", data:{ hello:"Hello Vue" } }) </script> 5. v-once
<div id="app"> <!-- 只在第一次加载渲染,当你改变hello的值的时候,前端显示不会发生改变 --> <span v-once>{{ hello }}</span> </div> <script> var vue = new Vue({ el:"#app", data:{ hello:"Hello Vue" } }) </script> 6. v-model
<div id="app"> <input v-model="hello"> <div>{{hello}}</div> </div> <script> var vue = new Vue({ el:"#app", data:{ hello:"" } }) </script> 7. v-on
<input type=‘button' v-on:click='num++'/>
<input type=‘button' @click='num++'/>
<button v on:click='say'>Hello</button>
<button v on:click='say()'>Say hi</button> <div id="app"> <button v-on:click="handelClick">弹出</button> <button v-on:click="num++">{{num}}</button> <button @click="num++">{{num}}</button> </div> <script> var vue = new Vue({ el:"#app", data:{ hello:"<h1>Hello Vue</h1>", num:0, }, methods:{ handelClick:function () { alert("haha"); } } }) </script>
<button v-on:click='say("hi",$event)'>Say hi</button> <div id="app"> <button v-on:click="handle1">点击1</button> <button v-on:click="handle2(12,$event)">点击2</button> </div> <script> var vue=new Vue({ el:"#app", data:{ }, methods:{ handle1:function (event) { alert(event.target.innerHTML); }, handle2:function (p1,event) { alert(p1+event.target.innerHTML); } } }) </script> 事件修饰符
<a v-on:click.stop= "handle"> 跳转 </a> <a v-on:click.prevent="handle"> 跳转 </a> <div id="app"> <div v-on:click="handelClick"> <button v-on:click="handelClick">弹出两次</button> </div> <div v-on:click="handelClick"> <button v-on:click.stop="handelClick">弹出一次</button> </div> <a v-on:click="handelClick" href="https://blog.csdn.net/qq_38723677">跳转</a> <a v-on:click.prevent="handelClick" href="https://blog.csdn.net/qq_38723677">不会跳转</a> </div> <script> var vue = new Vue({ el:"#app", data:{ hello:"<h1>Hello Vue</h1>", num:0, }, methods:{ handelClick:function () { alert("莫逸风"); } } }) </script> 按键修饰符
v-on 在监听键盘事件时添加按键修饰符:<input v-on:keyup.enter='submit'> <input v-on:keyup.delete='handle'> <div id="app"> 弹出提交:<input v-on:keyup.enter='submit'> 弹出删除:<input v-on:keyup.delete='delete1'> </div> <script> var vue = new Vue({ el:"#app", data:{ hello:"<h1>Hello Vue</h1>", num:0, }, methods:{ submit:function () { alert("提交"); }, delete1:function () { alert("删除"); } } }) </script> 自定义按键修饰符
<div id="app"> 弹出按键对应的按键码:<input @keyup="handelClick"> </div> <script> var vue = new Vue({ el:"#app", data:{ hello:"<h1>Hello Vue</h1>", num:0, }, methods:{ handelClick:function (event) { //keyCode 的事件用法已经被废弃了并可能不会被最新的浏览器支持,它可能已经从相关的Web标准中删除 alert(event.keyCode); //KeyboardEvent.code为替代实现,应被使用,但存在部分浏览器还未支持,Vue自定义按键也未支持 // alert(event.code); } } }) </script> Vue.config.keyCodes.f1 = 112 <div id="app2"> 点击按键A弹出提交<input type="text" @keyup.aaa="handel1"> </div> <script> //65是a键的keycode,给他起个别名,在上方就可以使用了 Vue.config.keyCodes.aaa = 65; var vue = new Vue({ el:"#app2", data: { }, methods: { handel1:function () { alert("提交"); } } }) </script> 8. v-bind
<a v-bind:href="url">{{targ}}</a> <a :href="url">{{targ}}</a> <div id="app"> <!-- 标准形式 --> <a v-bind:href="url">{{targ}}</a> <!-- 简写形式 --> <a :href="url">{{targ}}</a> <button @click="handel">修改跳转目标</button> </div> <script> var vue = new Vue({ el:"#app", data:{ targ:"跳转百度", url:"https://www.baidu.com" }, methods:{ handel:function () { if (this.targ=="跳转百度"){ this.targ="跳转莫逸风博客"; this.url="https://blog.csdn.net/qq_38723677"; }else { this.targ="跳转百度"; this.url="https://www.baidu.com" } } } }) </script> <div id="app"> <input type="text" v-bind:value="val" @input="handel">{{val}} <input type="text" v-bind:value="val2" @input="val2=$event.target.value">{{val2}} </div> <script> var vue = new Vue({ el:"#app", data:{ val:"", val2:"", }, methods:{ handel:function (event) { this.val=event.target.value; } } }) </script> class样式绑定
<div v-bind:class="{ active: isActive }"></div> <div v-bind:class="[activeClass, errorClass]"></div> <style> .active{ border: 1px solid red; width: 100px; height: 100px; } .col{ background-color: blanchedalmond; } </style> <div id="app"> <div v-bind:class="{active:isActive,col:isA}">测试</div> <div v-bind:class="[activeClass,colClass]">测试</div> <button @click="handel">切换</button> </div> <script> var vue = new Vue({ el:"#app", data:{ isActive:true, isA:true, activeClass:"active", colClass:"col", }, methods:{ handel:function () { this.isActive=!this.isActive; if (this.colClass=="col"){ this.colClass=""; }else { this.colClass="col"; } } } }) </script> <div v-bind:class="[activeClass,colClass,{act:isAct}]">测试</div> <div v-bind:class="arr">测试</div> //arr:[active,col], //data中 style样式绑定
<div v-bind:style="{ color: activeColor, fontSize: fontSize }"></div> <div v-bind:style="[baseStyles, overridingStyles]"></div> <div id="app2"> <div v-bind:style="styleObject">绑定样式对象</div> <!-- CSS 属性名可以用驼峰式 (camelCase) 或短横线分隔 (kebab-case,记得用单引号括起来) --> <div v-bind:style="{ color: activeColor, fontSize: fontSize,background:'red' }">内联样式</div> <!--组语法可以将多个样式对象应用到同一个元素 --> <div v-bind:style="[styleObj1, styleObj2]">绑定样式数组</div> </div> <script> new Vue({ el: '#app2', data: { styleObject: { color: 'green', fontSize: '30px', background: 'red' }, activeColor: 'green', fontSize: "30px", styleObj1: { color: 'red' }, styleObj2: { fontSize: '30px' } } }) </script> 9. v-if、v-else、v-else-if
<div id="app"> <input v-model="score"> <div v-if="score>=90">优秀</div> <div v-else-if="score>=80&&score<90">良好</div> <div v-else-if="score>=70&&score<80">一般</div> <div v-else>较差</div> </div> <script> var vue = new Vue({ el:"#app", data:{ score:100, } }) </script>
10.v-for
<li v-for="item in fruits">{{item}}</li> <li v-for="(item,index) in fruits">{{index}}-----{{item}}</li> <li v-for="item in myFruits">{{item.cname}}----{{item.ename}}</li>
<li :key="index" v-for="(item,index) in fruits">{{item}}</li> <div id="app"> <ul> <li v-for="item in fruits">{{item}}</li> <li v-for="(item,index) in fruits">{{index}}-----{{item}}</li> <li v-for="item in myFruits">{{item.cname}}----{{item.ename}}</li> <li :key="index" v-for="(item,index) in fruits">{{item}}</li> </ul> </div> <script> var vue = new Vue({ el:"#app", data:{ fruits:['apple','orange','aaa'], myFruits:[{ cname:"苹果", ename:"apple" },{ cname:"橙子", ename:"orange" },{ cname:"AAA", ename:"aaa" }] } }) </script> <div v-for='(value, key, index) in object'></div> <div v-if='value==23' v-for='(value, key, index) in object'></div> <div id="app2"> <ul> <li v-for="(v,k,i) in people">{{v + '---' + k + '---' + i }}</li> </ul> <hr> <ul> <li v-if='v==23' v-for="(v,k,i) in people">{{v + '---' + k + '---' + i }}</li> </ul> </div> <script> var vue = new Vue({ el:"#app2", data:{ people:{ name:"莫逸风", age:23, birthday:199803, } } }) </script> 四、Vue常用特性
1. 表单操作
基于vue的表单操作
<input type="text" v-model="name"> <input type="radio" id="male" value="1" v-model="gender"> <label for="male">男</label> <input type="radio" id="female" value="2" v-model="gender"> <label for="female">女</label> <input type="checkbox" id="ball" value="1" v-model="like"> <label for="ball">篮球</label> <input type="checkbox" id="sing" value="2" v-model="like"> <label for="sing">唱歌</label> <input type="checkbox" id="code" value="3" v-model="like"> <label for="code">写代码</label> <textarea v-model="textArea"></textarea> <span>职业:</span> <!-- select绑定一个数据 --> <select v-model="job"> <option value="0">请选择职业..</option> <option value="1">教师</option> <option value="2">软件工程师</option> <option value="3">律师</option> </select> <span>职业多选:</span> <!-- multiple="true"设置select多选,select绑定一个数组 --> <select v-model="job2" multiple="true"> <option value="0">请选择职业..</option> <option value="1">教师</option> <option value="2">软件工程师</option> <option value="3">律师</option> </select> <div id="app"> <div> <span>姓名:</span> <!-- input绑定一个数据 --> <input type="text" v-model="name"> </div> <div> <span>性别:</span> <!-- input绑定一个数据 --> <input type="radio" id="male" value="1" v-model="gender"> <label for="male">男</label> <input type="radio" id="female" value="2" v-model="gender"> <label for="female">女</label> </div> <div> <span>爱好:</span> <!-- input绑定一个数组 --> <input type="checkbox" id="ball" value="1" v-model="like"> <label for="ball">篮球</label> <input type="checkbox" id="sing" value="2" v-model="like"> <label for="sing">唱歌</label> <input type="checkbox" id="code" value="3" v-model="like"> <label for="code">写代码</label> </div> <div> <span>职业:</span> <!-- select绑定一个数据 --> <select v-model="job"> <option value="0">请选择职业..</option> <option value="1">教师</option> <option value="2">软件工程师</option> <option value="3">律师</option> </select> <span>职业多选:</span> <!-- multiple="true"设置select多选,select绑定一个数组 --> <select v-model="job2" multiple="true"> <option value="0">请选择职业..</option> <option value="1">教师</option> <option value="2">软件工程师</option> <option value="3">律师</option> </select> </div> <div> <span>个人介绍:</span> <!-- textarea绑定一个数据 --> <textarea v-model="textArea"></textarea> </div> <button @click="handel">提交</button> </div> <script> var vue = new Vue({ el:"#app", data:{ name:"", gender:"", like:[], job:"0", job2:[], textArea:"" }, methods:{ handel:function () { alert(this.name+""+this.gender+""+this.like+""+this.job+""+this.job2+""+this.textArea); } } }) </script> 表单域修饰符
<input type="text" v-model.number="num2"> <div id="app"> <div> <input type="text" v-model="num1"> <button @click="handel">+13</button> {{num1}} </div> <div> <input type="text" v-model.number="num2"> <button @click="handel2">+13</button> {{num2}} </div> </div> <script> var vue = new Vue({ el:"#app", data:{ num1:'', num2:'', }, methods:{ handel:function () { this.num1 = this.num1 +13; }, handel2:function () { this.num2 = this.num2 +13; } } }) </script> <input type="text" v-model.trim="num2"> <div id="app"> <div> <input type="text" v-model="num1"> "{{num1}}" </div> <div> <input type="text" v-model.trim="num2"> "{{num2}}" </div> </div> <script> var vue = new Vue({ el:"#app", data:{ num1:'', num2:'', } }) </script> <input type="text" v-model.lazy="num2"> <div id="app"> <div> <input type="text" v-model="num1"> "{{num1}}" </div> <div> <input type="text" v-model.lazy="num2"> "{{num2}}" </div> </div> <script> var vue = new Vue({ el:"#app", data:{ num1:'', num2:'', } }) </script> 2.自定义指令
Vue.directive 注册全局自定义指令
// 注册一个全局自定义指令 `v-focus` Vue.directive('focus', { // 当被绑定的元素插入到 DOM 中时…… inserted: function (el) { // 聚焦元素 el.focus() } }); // 注册一个全局自定义指令 `v-focus2` Vue.directive('focus2', { // 当被绑定的元素插入到 DOM 中时…… inserted: function (el,binding) { el.style.backgroundColor=binding.value; } }); <div id="app"> <input type="text"> 焦点会自动选中下一个输入框 <input type="text" v-focus> </div> <script> // 注册一个全局自定义指令 `v-focus` Vue.directive('focus', { // 当被绑定的元素插入到 DOM 中时…… inserted: function (el) { // 聚焦元素 el.focus() } }); var vue = new Vue({ el:"#app", data:{ hello:"<h1>Hello Vue</h1>" } }) </script> <div id="app2"> 设置背景颜色: <input type="text" v-focus2="collar"> </div> <script> // 注册一个全局自定义指令 `v-focus2` Vue.directive('focus2', { // 当被绑定的元素插入到 DOM 中时…… inserted: function (el,binding) { el.style.backgroundColor=binding.value; } }); var vue = new Vue({ el:"#app2", data:{ collar:"red" } }) </script> 自定义指令局部指令
directives 的选项,只能自本组件中使用局部指令v-focus)directives: { focus: { // 指令的定义 inserted: function (el) { el.focus() } } } 3. 计算属性
computed: { reversedMessage: function () //将字符串分割 return this.msg.split ('').reverse().join('') } } <div id="app"> <input type="text" v-model="hello"> {{changeHello}} </div> <script> var vue = new Vue({ el:"#app", data:{ hello:"hello" }, computed:{ changeHello:function () { return this.hello.split("").reverse().join(""); } } }) </script>
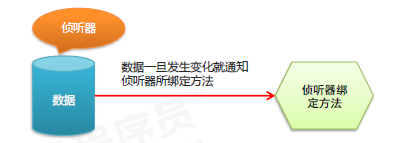
{{changeHello}}{{changeHello}} 4. 侦听器
<div id="app"> 姓:<input v-model="firstName"> 名:<input v-model="lastName"> <div>{{fullName}}</div> </div> <script> var vue = new Vue({ el:"#app", data:{ firstName:"", lastName:"", fullName:"", }, watch:{ firstName: function () { this.fullName=this.firstName+this.lastName; }, lastName: function () { this.fullName=this.firstName+this.lastName; } } }) </script> 5. 过滤器
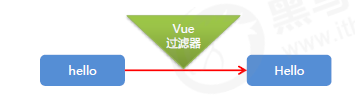
Vue.filter('过滤器名称', function(value) { //过滤器逻辑 }); <div>{{msg | upper}}</div> upper是相应过滤器 <div>{{msg | upper | lower}}</div> 级联使用 <div v-bind:id=“id | formatId"></div> 属性绑定时使用 filters:{ capitalize:function(){} } <div id="app"> <input type="text" v-model="name"> <div>{{name | upper}}</div> <div>{{name | upper | lower}}</div> <div v-bind:class="name | upper"></div> </div> <script> Vue.filter('upper', function(value) { return value.charAt(0).toUpperCase()+value.slice(1); }); Vue.filter('lower', function(value) { return value.charAt(0).toLowerCase()+value.slice(1); }); var vue = new Vue({ el:"#app", data:{ name:"", }, }) </script> Vue.filter('过滤器名称', function(value,arg1) { //value就是过滤器传递过来的参数 }); <div>{{date | format(‘yyyy-MM-dd')}}</div> <div id="app1"> <input type="text" v-model="name"> <div>{{name | upper(name)}}</div> <div>{{name | upper("111")}}</div> </div> <script> Vue.filter('upper', function(value,arg) { return value.charAt(0).toUpperCase()+value.slice(1)+arg; }); var vue = new Vue({ el:"#app1", data:{ name:"", }, }) </script> 6. 生命周期

<div id="app"> <!--实例初始化完成调用前四个方法--> <div>{{msg}}</div> <!--点击更新调用5,6个方法--> <button @click='update'>更新</button> <!--点击销毁调用7,8个方法--> <button @click='destroy'>销毁</button> </div> <script type="text/javascript" src="js/vue.js"></script> <script type="text/javascript"> /* Vue实例的生命周期 */ var vm = new Vue({ el: '#app', data: { msg: '生命周期' }, methods: { update: function(){ this.msg = 'hello'; }, destroy: function(){ this.$destroy(); } }, beforeCreate: function(){ console.log('beforeCreate'); }, created: function(){ console.log('created'); }, beforeMount: function(){ console.log('beforeMount'); }, mounted: function(){ console.log('mounted'); }, beforeUpdate: function(){ console.log('beforeUpdate'); }, updated: function(){ console.log('updated'); }, beforeDestroy: function(){ console.log('beforeDestroy'); }, destroyed: function(){ console.log('destroyed'); } }); </script>
本网页所有视频内容由 imoviebox边看边下-网页视频下载, iurlBox网页地址收藏管理器 下载并得到。
ImovieBox网页视频下载器 下载地址: ImovieBox网页视频下载器-最新版本下载
本文章由: imapbox邮箱云存储,邮箱网盘,ImageBox 图片批量下载器,网页图片批量下载专家,网页图片批量下载器,获取到文章图片,imoviebox网页视频批量下载器,下载视频内容,为您提供.
阅读和此文章类似的: 全球云计算
 官方软件产品操作指南 (170)